
I’ve always found miniature villages magical. When I first began my Department 56 collection, it was solely for the merriment of my young children as they peered eye-level into the streets of a tiny snow-covered village bustling with a life of its own. My boys are now grown, but I’m still building a christmas village display. Let’s be honest. I do it for myself. It turns out I’m as mesmerized by its magic as any 8-year-old.
Over the years as my collection has grown, I’ve also honed my architectural skills. And I think I finally have it figured out. This year I built a display that is not only charming but one I’ll be able to use for years to come. No more constructing my fictional city from scratch. And, aside from a few basic tools, I didn’t need a fully-stocked woodworking shop to build this display.
(This post may contain affiliate links; as an Amazon associate I earn from qualifying purchases. See disclosure here.)
supplies needed:
- 6 ft folding table
- 3 pieces of thin plywood, each measuring 2 ft x 2 ft
- wooden blocks
- power drill with a 1 1/8″ spade bit
- EPS (expanded polystyrene) white foam boards
- Hot Wire Foam Factory sculpting tool
- white fabric or felt
- fake snow flurries
- several short extension cords and surge protector
building the platform
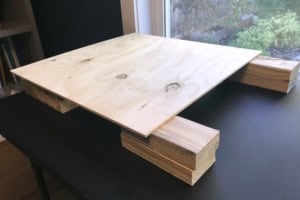
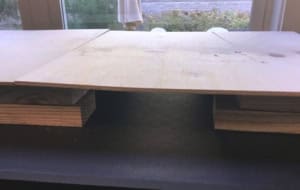
As any Department 56 enthusiast will tell you, the jumble of electrical cords is the biggest nuisance when constructing a village. I’ve always used a table skirt to hide the cluster of cords, but personally I like a cleaner look. So this year I found a solution. I bought 3 pre-cut pieces of plywood, each measuring 2 ft x 2 ft, from Home Depot. These fit my 6 foot table perfectly, and they are also easier to store than a large single piece of wood. I purposely left a few inches across the front of the table showing, as I plan to create a river there.
I aslo had Home Depot cut a few wooden blocks to use as risers. These should be stacked to at least 3″ high to allow ample room for cords. Now all my electrical infrastructure can easily be concealed, with only one cord (from a surge protector) plugged into the outlet beneath the table.
planning the lay-out
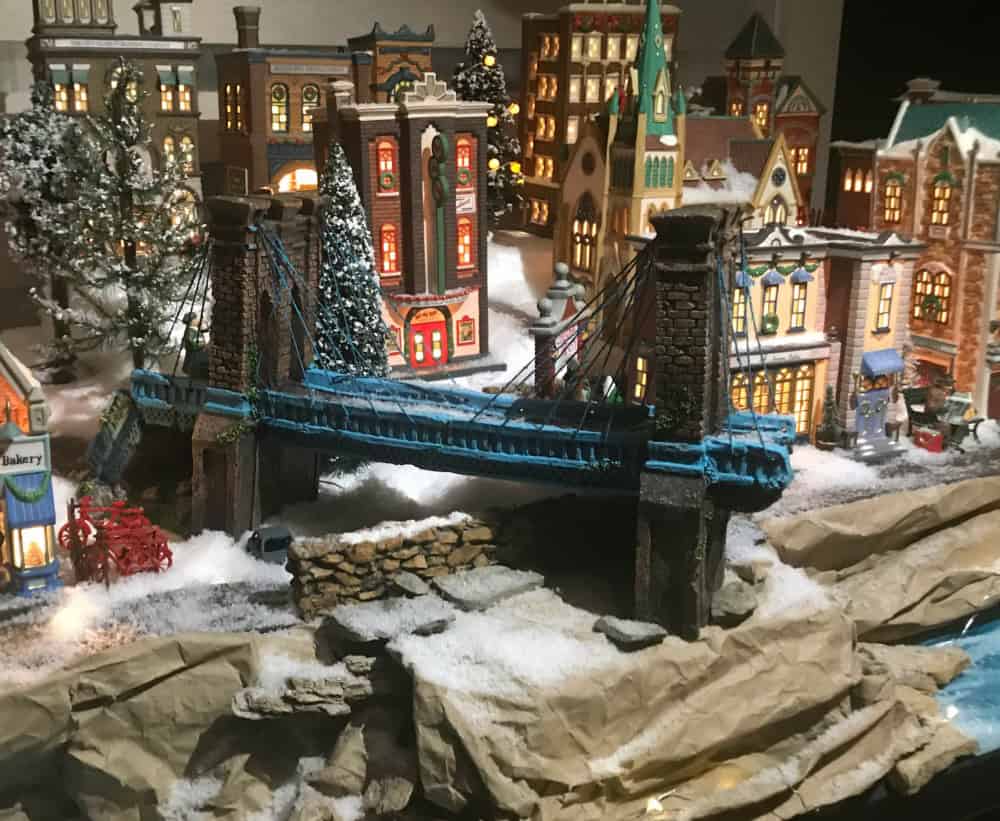
This next step is fun – planning the layout of the city. My village is the Christmas in the City collection from Department 56, so I like to fashion it as a replica of Covington, KY, a charming historical neighborhood nestled on the bank of the Ohio River, with a stunning view of the Cincinnati skyline. It’s also entertaining to see if Christmas party guests can recognize any of the city landmarks.
Keep in mind that a multi-tiered display gives a village depth and beauty. Using pieces of EPS foam, play around with building at least 3 levels, while experimenting with different building placements. Remember to build each level tall enough to showcase the buildings well. Don’t worry if the pieces of foam are roughly cut; they will be refined later with a sculpting tool.


drilling the holes
Once you have an idea of building placement, mark where you will need holes drilled for the electrical cords. Start with the buildings on the ground level (that rest on the bare wood, not foam). Underneath each building, draw a circle where a hole is needed. Be sure to mark the name of the building on the wood for future reference.

Next, move to level 2, drawing the circles on the foam beneath each house. The tallest level will be in the back, so holes are probably not needed for those, as the cords can easily drape over the back of the table and underneath the wooden platform.
For those houses on level 2, after a circle is drawn onto the foam, use the sculpting tool to carve a hole through the layers of foam. Next, draw a circle (for drilling) onto the wood directly beneath the foam hole.


Once all the cord placement holes are marked and cut through the foam, drill the holes into the wood bases, using a 1 1/8″ spade bit. *Tip: snap photos to help remember the building placements before dismantling it to drill the holes.
carving the foam
The hard work is mostly done. Now it’s time to bring the city to life. Rebuild the different levels with all the cord holes aligned. When adding each building, make sure the bulb is placed inside and the cord is pulled through the base and plugged into an extension cord.
Now it’s time to introduce you to a new tool. If you haven’t used a hot wire sculpting tool before and have been fashioning your village with craft store foam and a kitchen knife, you’re going to thank me. After seeing how skillfully structures and steps can be carved with this tool, I knew it would be worth the investment. My skill level is still not advanced, but my village has improved 100 percent since purchasing it.

Because the city has multi-levels, decide where steps are needed. With the sculpting tool, carve the steps. I had so much fun with this (it cuts the foam like butter), so I went crazy carving snow banks, erecting steps and pathways, and gently sloping all the rough boxy edges of the foam into more realistic snow-covered hills.


crafting the details
Now it’s time to fully unleash your creativity and imagination. For the ground level, cover the bare wood with either white fabric or felt. Next, add streets and sidewalks. Don’t worry if it still looks unrealistic; snow will be added to soften the edges. And don’t forget fences, decorations, trees and people!


adding waterways
Amp up the magic by adding a frozen pond or lake. Because my neighborhood rests on the bank of the Ohio River, I love adding an icy river with a rocky crags. This year I bought an inexpensive Plexiglas poster frame from Michaels then cut the Plexiglas into rectangular strips. Plexiglas makes beautiful waterways. Peel off the protective plastic film, then paint one side of the Plexiglas with acrylic paint. Once dry, add it to the village with painted side face down.


To create a rocky bank, I used paper grocery bags. Tear them into strips, dampen them with water, and crinkle them into balls. Then unfold them and mold them into the shapes you desire and let dry. Scavenge a few rocks from the yard to add as well. It’s that easy! In fact, I make my entire French creche with paper bags and rocks!
A river bank is also a clever way to hide the electrical infrastructure under the platform!


softening the edges
Lastly, sprinkle a layer of snow over the entire city. This camouflages the hard edges of the sidewalks and streets. Create snow mounds to cover any flaws. And don’t forget to “sweep” the walkways for an even more realistic effect.


The biggest compliment is a little share – pin the photo below!


First of all your ideas are wonderful and your village is beautiful . My sweet husband fixed my Dickens ( ish ) village in my bay window by constructing a three tiered riser that could be unhinged for storage . He solved the cord problem by putting all cords through a hole , under the board.
He used ” caulk “( white of course ) to outline each house with its own” snow pile ” , he put Velcro on bottom of street lamps and on the board ( board was painted white and roughed paint a little and sprinkled sparkle snow it on before paint dried ) . He also incorporated small mirrors for ice patches ! Thank you for your WONDERFUL ideas .
My beautiful man has passed but every year I when I get out my Christmas creations he built ( he also did a beautiful Nativity with a dark blue night sky and hundreds of stars / twinkle lights for my crystal Nativity sitting on a mirror ) among others I think of my sweet husband .
You have a lot of great ideas, some of which I will probably incorporate. Thanks a great deal for sharing. I do have one question, where did you get the bridge that you have in your village? Thanks again.
Sorry for the late response. The bridge is actually one made for an aquarium. I painted it blue.
Thank you for creative ideas! For years, I have been setting up a village on top of my piano. This year, we acquired more pieces (including Dept. 56) from an older family member. So, I enjoyed your ideas for creating levels within the village. I, too, would love to see a full photo of your village!
Really love this village♥️
Like another individual responded, I would also like to see a full photograph of the completed village that shows the front of the table you are using to display your village. It would really help to get an idea of how everything sits in the room and would also show the total number of buildings in your display. You’re right – at night that village has a magical feeling and I love it! Your river idea with the paper bags is fantastic and so realistic in the photos. I have some older porcelain village pieces that have always been displayed on the mantel. They fit perfectly and it’s a tradition for them to be there – nothing else. However, I have recently started collecting Department 56 (4 buildings so far and six figurines) and am looking for a way to display them that is more than sitting them on a table with a few trees. Thank you for sharing your wonderful villages – it has been one of my favourites.
Glad you enjoyed the post. I also have posts on my blog showing my setup of my Dept 56; take a look if you haven’t already. And yes, I agree, a photo from the full front is needed. I’ll see if I can find one. Also next Christmas I plan on setting it up differently and will be sure to include more photos.
Thanks for the update. I’ll take a look at the other photos as well. Looking forward to seeing the new setup next year!
Can I get a link to your blog please?
Thanks!
Beth
I found the individual scenes interesting as they weave into the total story of the village. Like you however, it’s difficult to stitche these scenes together without a full picture of the display. Still haven’t see that…
Wendy, I was born and raised in PA, moved to FL in 1961, remarried in 1982 and started my Dept. 56 Village. I just found you on Pinterest and wanted to make a quick comment: I am now 83-years-young and yesterday started my village. I am so excited to tell you about my “collecting” but today since I have Halloween, Thanksgiving, and Christmas all boxed up in the house, I am going to start making USTOR runs and try to get my house ready for 100% of my time on “MY VILLAGE”. It takes me longer as I’ve gotten older but that doesn’t mean I’m not putting up my village. I use two pieces of the big plywood and a riser for “Harper’s Farm” – and yes, I am a Harper from PA. Also do a wooded area called “Mill Creek” and sure enough there is a Mill Creek next to where I was born and raised. Didn’t mean to write a book and maybe I’ll get back to you once I’m on track.
Wendy, I just love your village! My cousin’s husband has Dept 56 pieces. I started collecting by buying pieces at Michael’s on sale years ago. Now I look in Goodwill and other discount shops for pieces and found quite a few (I even have some Dept 56 pieces-no buildings though). I don’t exactly make a village, I just place them in different spots throughout my home. I’d love to someday construct a village though.
Glad you enjoyed the post. Keep collecting for your village! It’s so much fun, isn’t it?
How funny! I was looking for displays and stumbled on this. I grew up in Villa Hills, KY. You have a beautiful display
We lived in Villa Hills for 15 years! Thanks for stopping by the blog, Jenn.
OMG that is gorgeous! You have a lot of patients!
Wow! It looks so amazing! Great job!
thanks so much!
This was amazing, I would love to see a follow-up where you show completing the platform!
Love your village. I collect department 56 dickens village and every year I struggle to find enough room to display them. I’ve still got lots of time to collect but DH wants me to stop. No way. No sure how to display them but youve given some good ideas..
I’m glad you enjoyed the post! I know, I need to stop collecting more for my village, too.
Hi Wendy,
Your village is absolutely beautiful. I have been putting a Christmas village up for over 20 years. It has now takes up two walls in my dinning room. You have given me some great tips on how to make it look even more realistic. I especially love the city you choose to replicate. I was born in Covington, Kentucky. Thanks for sharing and hope you enjoy the holiday season.
Linda, that’s so funny that you were born in Covington and stumbled across this post! These villages are addicting, aren’t they?
I love the way you staggered the village to give it depth. I do one every year as well. Then I want to shrink small enough to live in it! Ever go to the Historic District of Savannah, GA?? That’s my Department 56 village!! So quaint! Happy Holidays!!
I have not been to that district, but I bet it is charming and the perfect inspiration for a Christmas village!
Oh my word this is brilliant! I never thought to use white foam board for our tiered Christmas village display. Dang, we just set ours up last weekend and now I want to redo it with this brilliant idea. Your village display is fabulous!
Oh, I’m so glad you were inspired by this post!
This is just amazing Wendy! I have always wanted to build a Christmas village, but I don’t think mine would hold a candle to yours. So beautiful! We are so happy to be featuring you today at Charming Homes and Gardens. Pinned.
Thanks Kim!
This puts my snow village to shame.
awe, thanks!
This is charming! Thanks for sharing at Vintage Charm!
thanks!
Your village is beautiful. Thank you for sharing at Party In Your PJ’s.
thanks!
This is simply stunning! Thank you so much for sharing it with us at Farmhouse Friday!
Thanks Michelle!
Wow! I had no idea how much work went into putting together a village like this! We’ve never had one, but I’ve always loved the look, so maybe someday! Your village is spectacular. Thank you for sharing the tutorial! I pinned it to my Christmas board! I’m visiting from the Friday Favorites linkup today. Have a great weekend Wendy!
Thanks Marielle! I probably go a little overboard with my village construction! lol
Your village is wonderful. Thank you for sharing
Oh, thank you so much!
Thank you for the wonderful ideas! I have needing direction with my large village.
You are welcome! I know, putting up a detailed village can be daunting. Sometimes I skip a year!
Wendy, thank you so much for sharing! I loved the tutorial, could you recommend me a brand or brands to begin buying my village?
Thank you!
Hi Pamela, thanks for stopping by the blog. I’ve been collecting Dept. 56. Hallmarks used to carry them, and they can be bought online. They aren’t cheap, but I feel they are the best made ones out there and will last a lifetime.
Hi Wendy, your Christmas village is magical! Thanks for sharing at Vintage Charm! Pinning!