
Well, I did it again. Right when I’m at my peak of bragging about how minimalist I’ve become, I go and volunteer to make photo props for a charity event. Yes, it’s a good thing to do… for women with online calendars and mini-vans and chore charts posted in their laundry rooms! Not for someone who has her groceries delivered and hasn’t checked her LinkedIn profile in over five years. Not for a self-proclaimed minimalist who painted all her walls white and marvels daily at how healthy her faux Fiddle Leaf Fig looks.
But it’s done now. I volunteered to plan the kids’ booth at our neighborhood Streetfest. So I may as well give it my all. Besides, I’m pretty sure my faux plants won’t die from neglect.
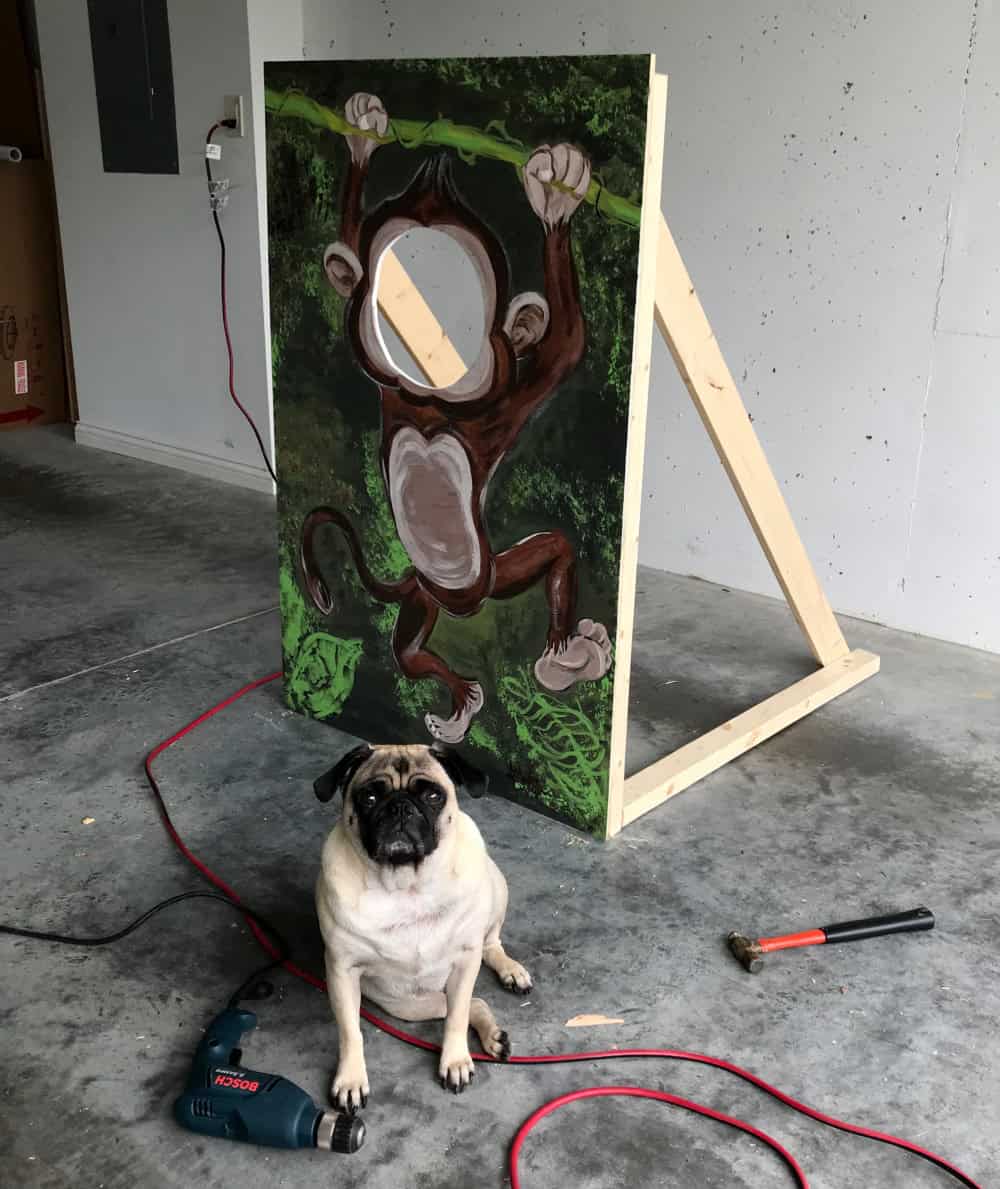
Last year, the Streetfest committee rented several wooden photo props with face cut-outs and they were a big hit. They were also expensive. So – wanting to put as much work on my plate as possible – I volunteered to make some that could be used every year. Surprisingly, the project unfolded nicely.
(This post may contain affiliate links; as an Amazon associate I earn from qualifying purchases. See disclosure here.)
supplies needed:
- plywood – approx. 30″ x 48″ for one prop
- two boards (2″ x 3″ planks) measuring 38″ long and two measuring 41″ long (for one prop)
- two boards (2″ x 4″ planks) measuring 60″ long, with both ends cut at 45 degree angles (for one prop)
- jig saw
- electric drill
- hammer & nails
- sandpaper
- white paint
- acrylic craft paint
- clear sealer
step 1 – prepare the boards

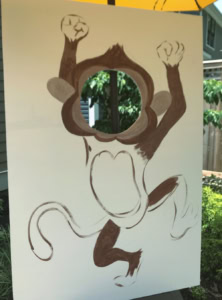
I went to Home Depot and had them cut a 4′ x 8′ piece of 15/32″ sanded plywood into three equal pieces. That left me with 3 pieces of plywood, each measuring about 30″ x 48″ – perfect for three photo props. Next, I sketched a very rough draft of the design I wanted to paint on each board, so I could pinpoint the position for the face cut-out. With a small plate and pencil, I traced a circle for the “face.”
I was then ready to try out my new Ryobi jig saw. I read the instructions, inserted the blade into the saw, and used my patio chairs as sawhorses to hold the board. Only problem – how to begin. The blade wouldn’t pierce through the wood to begin. Hmm… Then it hit me. I used my electric drill to make a hole in the middle of the circle, big enough to insert the blade. Once the blade was inserted, I was able to operate the saw. NOW LISTEN CLOSELY. This was ingenious. Resourceful. Brilliant, even. It wasn’t until after I finished cutting all the holes, that I began surfing the net and discovered that this technique is exactly what professionals use. I even came across this helpful video below. I DID NOT SEE THIS BEFOREHAND, so as far as I’m concerned, I invented the technique.

After the holes were cut, I sanded all the boards, especially smoothing out the inside of the holes. Then I lightly wiped the boards with a tack cloth; this is simply a rag dampened with turpentine used to lift the small dust particles from the board.
step 2 – paint the boards
Before painting my design onto the boards, I first prepped them with a base color. I used some left-over interior/exterior white paint I had on hand and gave each board two thick coats.
step 3 – create the design
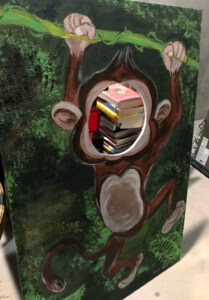
Now for the fun part. For the first board, I decided to paint a monkey. I sketched my design onto the board, then painted it with craft acrylic paints. It was fun to see the design come to life.
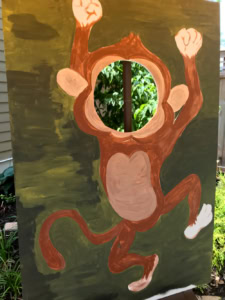
For the second board, I realized it would be best to paint the background first, then draw my design on top.

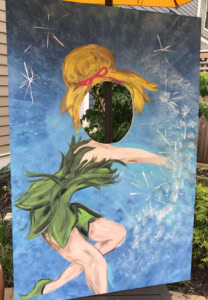
And for the third board, I painted a giraffe & lion. If you think the lion looks like a gorilla wearing a sunflower costume, you’d be wrong.

step 4 – build the frame
The easiest route, of course, is to ask a friend who is a carpenter to build the frames for you. But if you don’t know any handmen or if you just don’t have any friends, then grab a hammer & follow these instructions. Alright. Of course you have friends, but you may want to build this yourself anyway!
I bought most of the lumber at Home Depot, but because they don’t make speciality cuts for wood, I bought the 2 x 4s for the angled pieces from the local Ace Hardware. They cut the ends at 45 degree angles. Then I pieced the triangles together as shown below and used framing nails to put them together.


Next, I placed the triangular frames behind the plywood boards and attached them with screws inserted through the front. I used screws so they could be removed and the props could be stored flat for transporting.


Don’t worry if the boards don’t line up exactly, as long as the prop is stable.

step 5 – finishing touches
Once the props were put together, I sprayed the designs with a clear sealer and let dry. I have to say, this was not an easy project, as I’m new to woodworking. But it can be done. It can be marked off my to do list. And it can be a valuable lesson to me going forward to learn the art of saying no.

The biggest compliment is a little share – pin the photo below!


hello would you be able to make us a school bus for kids pls about 4 windows pls
I’m sorry. I don’t make them for sale. But that would surely be a cute idea!
But she just showed you how to do it.
Thanks for your basic ideas … i’m also thinking about making such a board and got some inspartion on your site;O)
https://www.happyboothco.com/ Wow that is so creative, might have to make this for my photo company! Thank you.
What size hole did you cut out for the face?
I actually cut the face holes a little too large. Just estimate the frame of your face, and it should work for children.
I love ideas like this that you can DIY instead of spending a ton of money. This way you can make exactly what you want. Thanks for sharing!
Thanks Jemma!
Wow! Those boards look amazing!
Great work!
Woah these are so cool! I think your problem might be that you are really good at this sort of thing. If you’d made a hot mess they would never have asked you again!!!
Julie – Yes! I should have made them ugly, right? lol Oh well, it was fun to do.
Wow these are awesome and super cute! Great idea for kid parties 🙂
Awww, the pug is super cute! I have a pug too, his name is Buster!! Anyway, thanks for this! We’re planning to do this on my nephew’s birthday!