
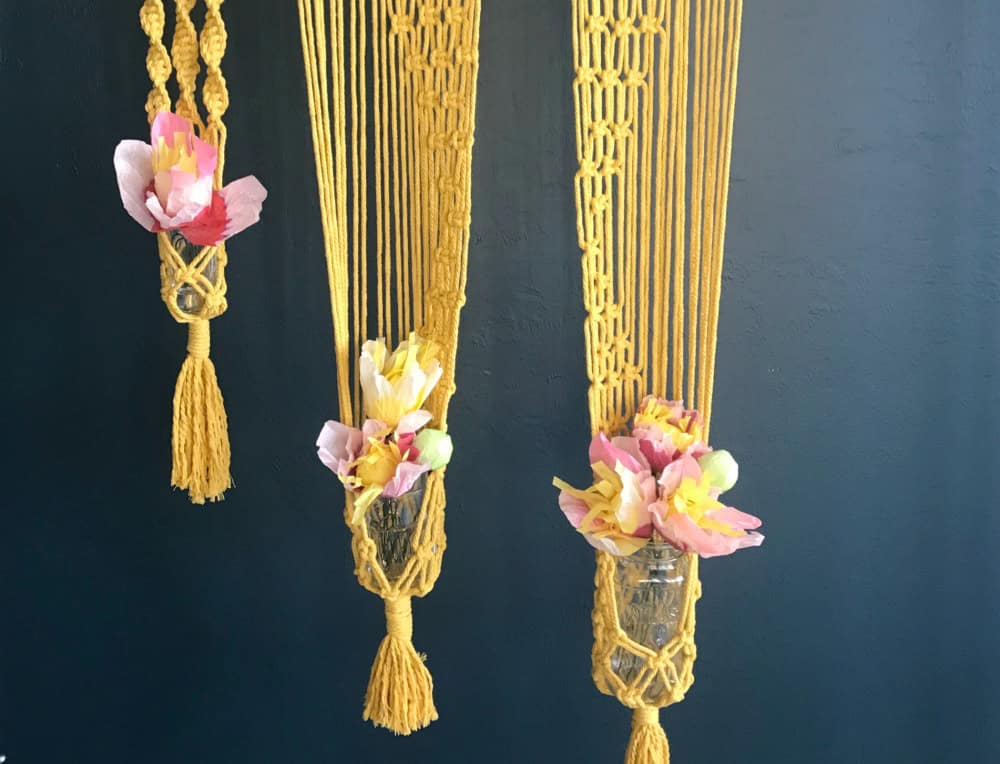
When I began this project, all I knew for sure was that I absolutely love the mustard yellow cording. Other than that, I had no idea what I was going to make. I just kept knotting and experimenting, and the end result is quite pretty. A triple macrame plant hanger. I also adore the wooden pole I decoupaged in Rifle Paper Company napkins (tutorial coming next week). This wall hanging definitely has a romantic boho vibe!
(This post may contain affiliate links; as an Amazon associate I earn from qualifying purchases. See disclosure here.)
supplies needed:
- yellow cotton macrame cord – 430 feet
- painters’ tape
- scissors
- wooden dowel, at least 1/2″ diameter
getting started
Cut 30 pieces of rope, each measuring 14 feet long. Wrap a small piece of masking tape around each end of rope to prevent fraying while weaving the design. Next, tie each piece to the wooden pole using a Lark’s Head Knot.

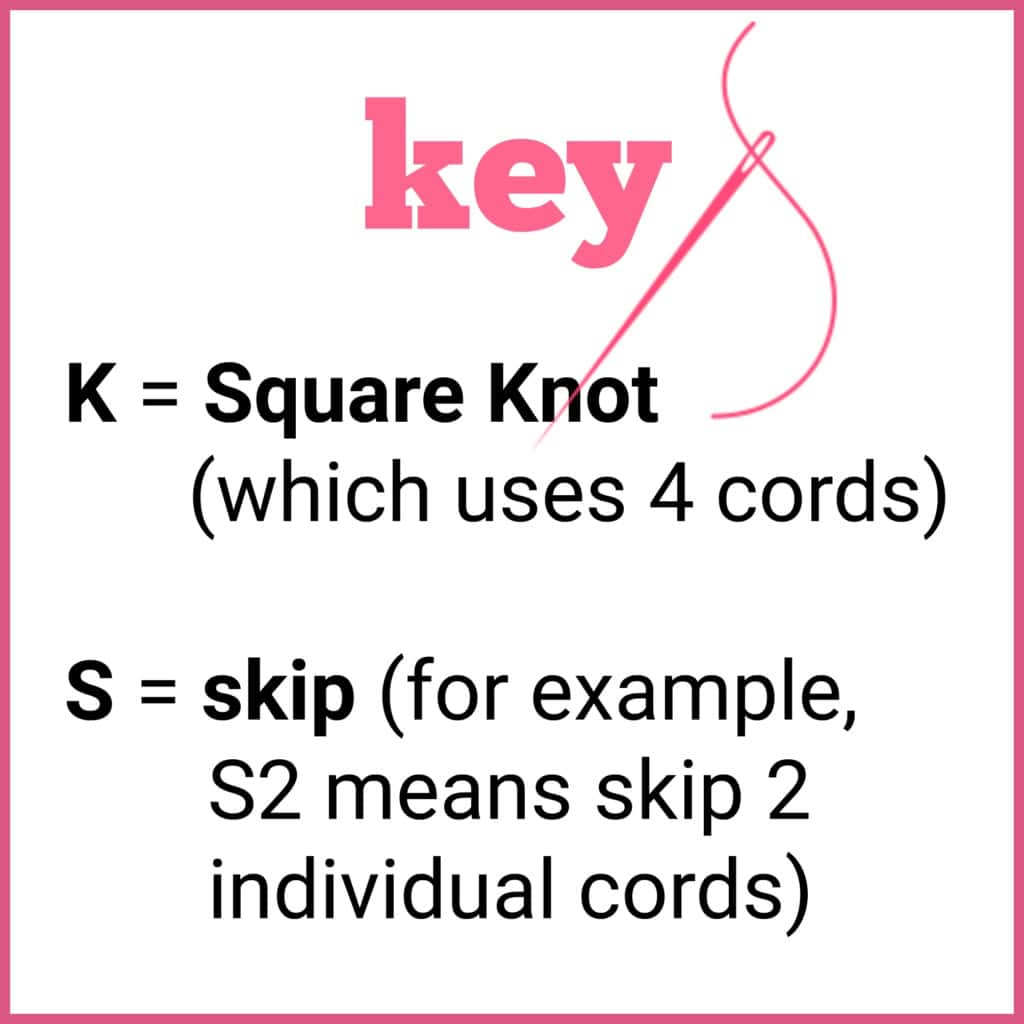
You now have 30 Lark’s Head Knots tied onto the pole and 60 individual cords hanging. To follow the instructions correctly, you need to understand the following key. While knotting, try to keep each horizontal row even, and always go from left to right. To make a proper Square Knot, see the tutorial here.
plant hanger / segment one
The first 6 Lark’s Head Knots (the first 12 individual cords) will be used to form the plant hanger in the first segment.
Row 1 – start with 1st cord: 3K (starting with 1st individual cord from the left, tie 3 Square Knots)

Row 2 – start with 3rd cord: 2K (starting with 3rd individual cord from the left, tie 2 Square Knots)

Row 3 – start with 1st cord: 3K
Row 4 – start with 3rd cord: 2K

Row 5 – using the first 4 cords: 1 HALF SQUARE SPIRAL KNOT* (The length of this knot is 20 ties.)
*HALF SQUARE SPIRAL KNOTS: To learn to make this knot, see my tutorial video below.

Row 5 – now using the next 4 cords: 1 HALF SQUARE SPIRAL KNOT (The length of this knot is 20 ties.)
Row 5 – using the last 4 cords: 1 HALF SQUARE SPIRAL KNOT (The length of this knot is 20 ties.)

Row 6 – start with the 3rd cord from left: 2K, S2

Row 7 – start with the 1st cord from left: 3K

Row 8 – start with 3rd cord: 3K (As you tie the 3rd Square Knot, a circular pocket will start to form, as shown below.)

Row 9 – below the last row of knows, make a row of Alternating Square Knots
![]()
An inch below the last row, make a Wrapped Knot. The first segment is now complete.


plant hanger / segment two
Now that the first segment is completed, the next 12 Lark’s Head Knots (24 individual cords) will comprise segment two.
Row 1 – start with the 1st cord from left: 6K

Row 2 – start with 3rd cord from left: 5K, S2

Row 3 – start with 5th cord: 5K

Row 4 – start with 7th cord: 4K, S2
Row 5 – start with 9th cord: 4K
Row 6 – start with 11th cord: 3K, S2
Row 7 – start with 13th cord: 3K
Row 8 – start with 15th cord: 2K, S2
Row 9 – start with 17th cord: 2K
Row 10 – start with 19th cord: 1K, S2

Row 11 – start with 21st cord: 1K
Row 12 – start with 19th cord: 1K, S2
Row 13 – start with 17th cord: 2K
Row 14 – start with 15th cord: 2K, S2
Row 15 – start with 13th cord: 3K
Row 16 – start with 11th cord: 3K, S2
Row 17 – start with 9th cord: 4K
Row 18 – start with 3rd cord: 5K, S2
Row 19 – start with 1st cord: 6K
Row 20: below the last row of knows, make a row of Alternating Square Knots (you will see a circular pocket starting to form)

An inch below the last row, make a Wrapped Knot. The second segment is now complete.
plant hanger / segment three
Now that the second segment is completed, the next 12 Lark’s Head Knots (24 individual cords) will comprise segment three.
Row 1 – start with 1st cord from left: 6K
Row 2 – start with 3rd cord: 5K, S2
Row 3 – start with 1st cord: 5K, S4
Row 4 – start with 3th cord: 4K, S6
Row 5 – start with 1st cord: 4K, S8
Row 6 – start with 3rd cord: 3K, S10
Row 7 – start with 1st cord: 3K, S12
Row 8 – start with 3rd cord: 2K, S14
Row 9 – start with 1st cord: 2K, S16
Row 10 – start with 3rd cord: 1K, S18
Row 11 – start with 1st cord: 1K, S20
Row 12 – start with 3rd cord: 1K, S18
Row 13 – start with 1st cord: 2K, S16
Row 14 – start with 3rd cord: 2K, S14
Row 15 – start with 1st cord: 3K, S12
Row 16 – start with 3rd cord: 3K, S10
Row 17 – start with 1st cord: 4K, S8
Row 18 – start with 3rd cord: 4K, S6
Row 19 – start with 1st: 5K, S4
Row 20 – start with 3rd: 5K, S2
Row 21 – start with 1st: 6K
Row 22 – below the last row of knows, make a row of Alternating Square Knots (you will see a circular pocket starting to form)
Finish with a Wrapped Knot.


A very long post, I know, but the finished project is sweet! Happy Knotting!
The biggest compliment is a little share – please pin the photo below!

Need to save this for later?


Thanks for your post.Really this article is very helpful for me .
can you tell me where I will get this kinds of article?
You you have dimensions on the finished piece?
How do you keep the jars from falling out forward. Mine will not stay in place.
Thx
You may need to try different sizes. Try using shorter jars.
Wow, Wendy!!! You create tutorials like I do (I make them for sewing projects)… BIG!!! Love all the knots! I haven’t ever tried to macramé but my best friend Janet used to make all kinds of plant hangers when we were in high school. I think she still does as I remember one hanging plant in a pretty green macrame hanger the last time I was at her house (a few years ago, we live in different states). Thank you for sharing at Share Your Style this past week. I am happy to feature at SYS #248 this week! <3
Happy spring to you,
Barb 🙂
thanks so much Barbara!
Wow great tutorial. I like the way you highlighted the rows in the photos. That will be very helpful to anyone who wants to make your project. Thanks for sharing with us at Creatively Crafty #ccbg
You are welcome!
OMG, I love this macrame planter. Congratulations, you are being featured at Over the Moon Linky Party. I hope to see you there. https://www.eclecticredbarn.com/2020/03/over-moon-linky-party_15.html
Hugs,
Bev
That is awesome! Thanks for featuring my project!
These are beautiful. I’ll be featuring them at Handmade Monday this coming week 🙂
Thank you Julie!
These are fabulous!
Michelle
http://mybijoulifeonline.com
I’m so happy you stopped by!