
I’ve sewn tailored seat cushions before, with custom piping and hidden zippers, and let me tell you something. Unless you are an expert sewist, they can be tricky. That’s why, when my daughter-in-law asked me to make some bench cushions, I devised a new strategy for making easy-to-sew removable cushion covers that would still deliver tailored results.
(Affiliate links included for your convenience. As an Amazon associate I earn from qualifying purchases. See disclosure here.)
step 1 – prewash fabric
Don’t be lazy. If you want cushion covers that can be removed and washed (especially practical if you have pets), then don’t skip this step. You don’t want the covers to shrink with that first washing!
step 2 – cut foam
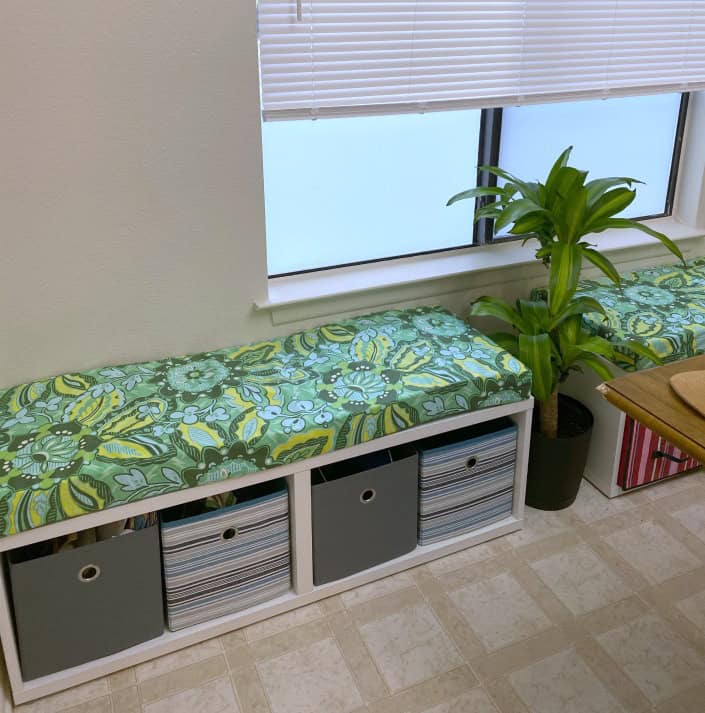
Mel wanted two cushions, each measuring 48″ x 16″ x 3″ thick. Yes, she’s a girl after my own heart – precise and organized! If you’ve never cut foam before, remember to use a serrated knife or better yet an electric carving knife.
step 3 – cut fabric
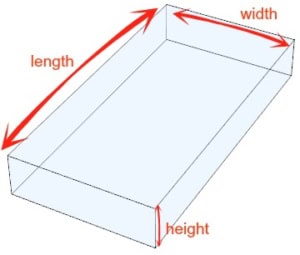
Cut one piece of fabric for each cushion, using this formula to determine correct cutting size:
2(width) + 2(height) + 8 = WIDTH
length + 2(height) = LENGTH
For example, my foam measures 48″ x 16″ x 3″. Here is how I calculated the correct size to cut my fabric: 2(16) + 2(3) + 8 = 46″ WIDTH and 48 + 2(3) = 54″ LENGTH. Therefore, I cut a piece of fabric 46″ x 54″.
step 4 – hem the long edges
Next, press the fabric to remove wrinkles. For both long edges of the fabric, turn over about 2″ and stitch down, creating a hem.

step 5 – stitch ends together
Fold the fabric, with right sides together, so that the long edges overlap. Using a tape measure, adjust so that the folded width equals {2(foam height) + 2(foam width)} divided by 2. For example, see my calculation below for my cushion (yours will be different):
(2 x 3) + (2 x 16) = 38
38 divided by 2 = 19
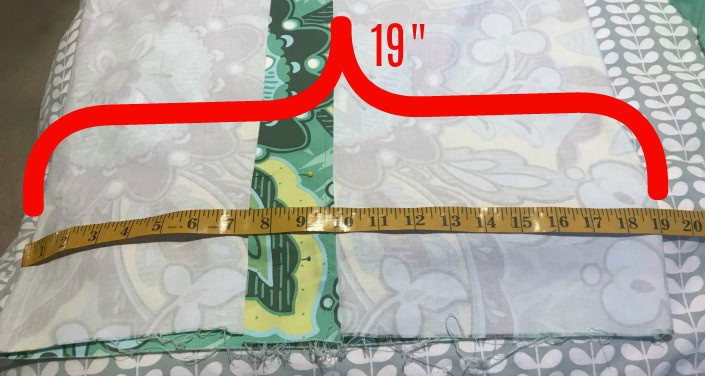
I suggest placing your folded fabric on an ironing board, measuring and pinning as you work. Once the fabric is folded to the correct width and pinned in place, stitch both ends closed. Reinforce by stitching over the seams a second time. To determine the finished length of the cover, use the following formula: foam height + foam length = finished length of cover. For example, for my cover I added 3 + 48 = 52 finished length.

Trim seams.

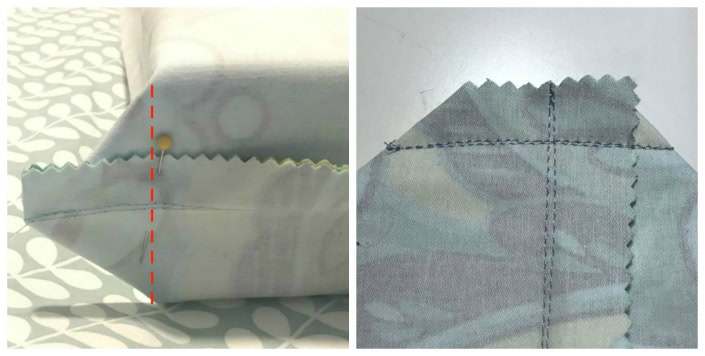
step 6 – stitch corners
Before turning the cover right side out, slip it onto the foam cushion. Pin corners as shown below. Remove and stitch. Reinforce seam with a second stitch; trim.
step 7 – adding velcro
Stitch velcro tabs onto the cover, so once the cover is on the foam, the opening can be sealed. The best way to do this is to place the folded cover, right side out, onto the ironing board. Use measuring tape to ensure that the folded cover is the correct width (as determined in step 5). Then pin the two back overlapping pieces together at several places, marking where to sew the velcro tabs.

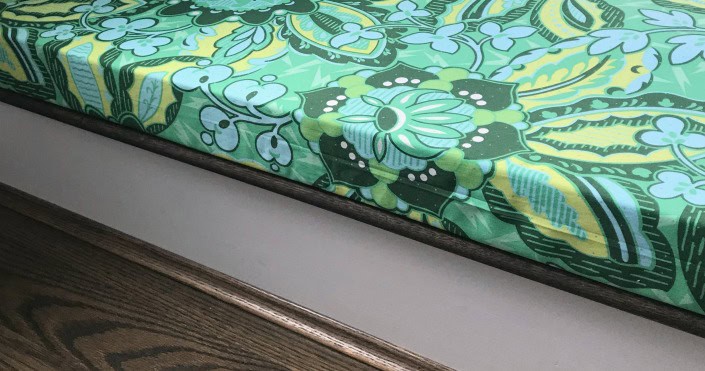
Now you are done! And wasn’t that a lot easier than adding zippers and piping? In case you are wondering, this adorable fabric I used is a home decor fabric by Amy Butler. I love her modern vintage prints!

*Just in! My daughter-in-law just received the cushions I sent her and snapped this photo to show me how they look. Very cute! (This post is shared at the Craftastic Monday Link Party with lots of other clever ideas.)
The biggest compliment is a little share – pin the photo below!


I’m new at sewing. I’m wondering why there is no mention of accounting for seam allowance/hem in cutting the fabric? How can I use up two inches on each long side and still have a correct measurement for covering the cushion? This is a great pattern but I just don’t understand.
Hi Jane, I re-read the post and can see how it can be a bit confusing. In the calculations I gave, I included 2″ for seam allowances. Just be sure to double-check your measurements on your own cushions as you follow the tutorial. You may need to adjust.
Easy tutorial ! Thank you so much Wendy ! Your directions, pictures, & mathematical diagrams were spot-on and so very helpful !! I love how my project turned out !
So, where does the Velcro come in remove the stitching where in part one??
Great tutorial although I can’t get the corners to match up. What am I doing wrong?
Thank you! This worked great and now my floating bench has comfy orange cushions for a nifty dining nook!
I’m no math wizard, but love to sew. Is the + 8 inches in the measurements the overlap for the velcro closure? I do love the simplicity of your pattern!
Thanks so much for this quick easy way to cover cushions. I made 2 sets for my porch which includes 2 rockers and a glider. After making the chair cushions, I realized they would need ties to hold them in place. It took me longer to make the ties than it did to make the cushion. Thanks for the post.
Can someone help me with this? I have measured and cut my two pieces of fabric and now I don’t know which sides to fold and sew the two-inch edges on. The directions say to do this on the “long sides.” Does this mean the sides that are currently the longest (because they will be wrapped around the cushion), or the “length” sides, which are currently shorter but in the end will be the long sides on the cushion?
OK, now that I’ve looked again at the pictures for the next step, Step 5, I am going to assume that the “long sides” refers to the sides that will eventually be the length of the cushion. For myself, I’m going to rewrite it as, “For both SHORTER edges of the fabric, turn over about two inches, press, and stitch down, creating a hem.”
I think the first seam runs vertically, parallel and halfway between the two long sides of the finished cushion. If I’ve confused myself again, I’ll be back to say my cushion covers turned out very strange….
You totally lost me on the measuring steps. Looks like I’m not the only one. Need layman’s terms please.
This looks brilliant and I was going to try it but then it occurred to me – will this work if the cushion has a hard board base so isn’t flexible to bend into the cover? Thank you.
Good catch. It probably won’t work the best.
If it has a hard wood base, I’d probably cover it with fabric and staple the fabric to the bottom of the base.
Hi thank you for the amazing tutorial! Just wanted to comment on the maths:
You say “{2(foam height) + 2(foam width)} divided by 2”
So basically that is equal to foam height + foam width… no need to multiply and divide! Or am I missing something?
Oh my! You may be right. I majored in English, not Math obviousy! So sorry for the confusion. lol
Thanks for these instructions. Two bench seat covers completed.
Oh wonderful! Glad the post helped!
Thank you so much! We have a lovely new cushion cover in just a couple of hours (no sewing machine here 🙁). The maths worked perfectly and the photos made the method easy to follow. Very grateful x
Thanks for sharing your project. I’m looking at this as a newbie. In step 3 you define the cutout to be 46″x54″, but in step five you fold the fabric to a 19″ overlap: half of the 38″ from the 38+8 cutout. Where does the extra 8″ of material included in that 46″ cutout dimension go?
Woo Hoo thank you so much, very impressed. new bench foam cover made in under an hour and its a perfect fit, Love the tutorial and will be using technique in future again
Christine, that is great to hear! So glad the post helped!
Hi Wendy, My cushion is 55 length x 25 width x 2 height. If I’m using your calculations correctly I would cut my fabric 59 L x 62 W. My material is only 54″ wide. I’m not sure how I can make with cushion without having to sew pieces on each side of the width and length. Do you have any recommendations? Thanks so much.
Hi Wendy, I found some really nice cotton canvas material that is 72″ wide so I no longer have an issue. I will be making this cushion cover as soon as my material arrives.
Oh that is great! I was just about to get out pencil and paper and figure out a plan for you! lol Good luck! Show me pics of your finished product.
Hi Wendy, I’m a novice sewer so I apologize in advance for my questions :). I’d like to apply a long strip of velcro rather than tabs. Can I apply the velcro strips right before I sew the seams for my finished length? I would very much appreciate your expert advice.
Hi Elaine, you could do that. Good luck!
I am doing 24” x 72” but my fabric is 54” wide – help! Thanks
Hi Kahn! I ran into this same problem (: hopefully you’ve got it figured out, but I’ll share what I did in case anyone else has this same question!
So my bench is 24 1/2” x 64” and the height was 3”. Using her instructions, I needed
W = 2x(24.5) + 2x(3) + 8 = 63 inches
L = 64 + 2x(3) = 70 inches
The fabric I chose was 44” wide only, so I ordered 3 yards of fabric total: 44” W x 108” L
This next part is a bit tricky… Since I needed 70” length (including the extra for seams), I measured to the 70” and cut the remaining portion off: this leaves me with two pieces of fabric:
One is 44” x 70” (set this one aside) and the other is 44” x 38”
Take the piece you just cut off (in my situation, 44” x 38”) and cut it in half. Pay attention to which way you’re cutting: I needed 2 pieces of 22” x 38”
Then I sewed these two pieces together long way, top to bottom, for 1 piece. I used about 2” of seam from the length, so this piece is 22” W x 74” L.
I then centered this against the big piece that we set aside (44” W x 70” L) so 44” W + 22” W = 66” W. Lengthwise, there were 2 inches extra on each end of the Frankenstein piece (74”), compared to the original (70”). I cut these extra inches off after the next step. Pin about 1” of seam (2” total since the frankstein piece = 1” and original = 1” match together). Sew down the entire length, then cut off the extra 2” on each end. This will give you one piece 64” W x 70” L
Hope that wasn’t too confusing (:
Using your measurements, which doesn’t include height, so I’ll just assume 3”, and assuming prewashing your fabric doesn’t shrink:
One extra yard should be enough: so 3 yards total
24” x 72” requires
W = 2(24) + 2(3) + 8 = 62”
L = 72 + 2(3) = 78”
Measure 78” and cut off the remaining portion, so you have (1) piece of 54” x 78” (set aside) and (1) piece of 54” x 30”.
You will need to cut this 54” x 30” piece into 3 equal parts: 18” x 30”
Sew these together to make one long piece 90” long, minus (2” seam x 2), so 86” is the length: 18” W x 86” L
Center this against the big piece we set aside (54” x 78”).
The 54” (original) + 18” (Frankenstein piece) will give you a new width of 72”, minus 2” for the seam will be 70”.
After sewing this together, cut off the extra 4 inches from each lengthwise end (86” – 78” = 8, so 4 on each side)
Hope this helps!!
Easy to sew cushion covers indeed. Following your tutorial it is easy to sew. Will I be able to sew a cover for my cushion that is attached to my couch using your technique? Maybe, if you have the time you could show how to do that.
Loving this idea. I have all I need to get my cushions covered but I haven’t done anything as yet. After seeing this I am going to start something….lol.
Glad you liked the post!
Thank you so much for the instructions! I appreciate the instructions and your detailed math explanation for figuring the amount of material to use. I used two different prints so I had to modify the back some in order to keep just one print in the front. My son loves this cushion! It is only a one-inch foam cushion but it serves the purpose for what he wanted. I tried to attach a photo but for some reason it will not load.
Super helpful and love the presentation…including the arithmetic. I’m sure it’s due to some app tracking me, but I’m still grateful for the timely “popping up” of this article. Thanks again. I think I will subscribe. Like your style, I can tell. 😉
Thanks!
This looks like a great way to make my cushion cover. However, I am confused by the finished length. You determined it to be 52”, but the picture that follows shows 51”; which makes sense since it is 48”+3”. Was your finished length 52” or 51”? Thank you
Never mind. I see the 52” is an error which should be 51”! Got it. Ready to give it a try.
Hola Blogger (s),
Me gusta mucho tu contenido. Fue muy informativo y útil para mí. Buen trabajo. Siga haciendo este gran trabajo por nosotros. Me encantó. Si alguien interesado en Arch Scroll, Ribbon Expander Roll, Scroll Roll, 3 Curve Bar Expander, Rubber Roller, visite Mi sitio web .
Gracias
Equipos ConPapTex
These turned out lovely, Wendy! Thanks for sharing at Vintage Charm!