
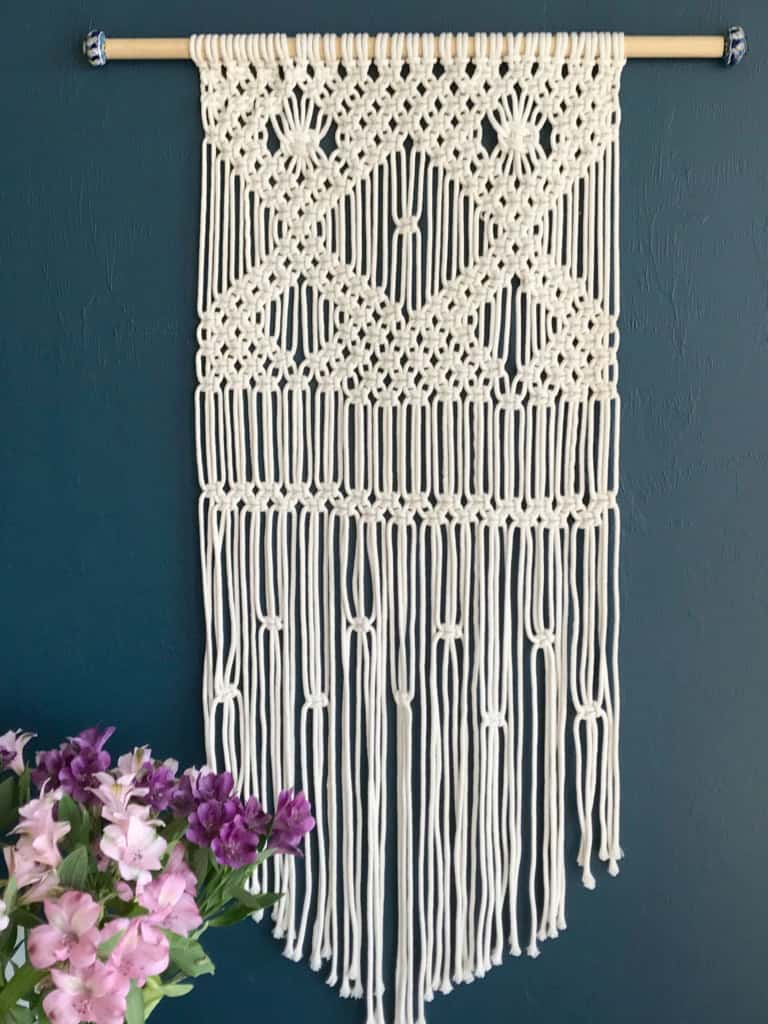
There are so many beautiful macramé wall hangings on my Pinterest boards; I want to make them all! However, before tackling a complicated pattern, I needed to get my feet wet with a simpler, basic macramé design. I stumbled upon the perfect pattern at Dupetitdoux (it is both lovely and moderately easy), but there was a slight problem. The instructions were in French. So, after an afternoon of translating along with some rope-knotting trial and error, I ended up with this sweet, little wall-hanging. (Finished size is approximately 22″ W x 48″ L.)
This pattern is an easy one for beginners, and it looks awesome, right? It’s a shame to let all my verb conjugations go to waste, so I’m sharing the instructions with you!
(Affiliate links included for your convenience. As an Amazon associate I earn from qualifying purchases. See disclosure here.)
What are you waiting for? To get started, you’ll need the following supplies:
- One dowel rod (the one I used is 7/8″ circumference and 28″ long)
- Two ceramic drawer knobs to use as finials
- Five 100-foot rolls of cotton clothesline (3/16″) (found the best price here.)
- Masking or painter’s tape
- Scissors
**Update: Oh wait!…I recently converted this tutorial into pdf form – free for you to download and keep! There are 2 pages of step by step instructions with photos. Click to download: Wall Hanging for Beginners – pg 1 and Wall Hanging for Beginners – pg 2
step 1 – Lark’s Head Knot
Cut rope into 28 pieces, each 16 feet long. Tie the cords onto the pole, as shown in the photo below. (I never knew until recently that this knot has an actual name – the Lark’s Head Knot.)

How to make a Lark’s Head Knot:

step 2 – Square Knot
The Square Knot is the most basic of all macramé knots, and it is the only one you’ll need to know in making this wall-hanging. Practice a few times until you get the hang of it.
How to make a Square Knot:


- Always work with 4 strands of rope.
- Place the right outside rope across the 2 center ropes. (Always start with the right side.)
- Run the left outside rope over the right outside rope then under the center cords and up through the opening.
- With the outside strands, gently tighten the knot.
- Make sure the knot is taunt, but be careful not to pull too strongly.
- (Now repeat the first four steps, starting with the left side this time.) Place the left outside rope across the 2 center ropes.
- Run the right outside rope over the left outside rope then under the center cords and up through the opening.
- With the outside strands, gently tighten the knot.
How to make a Double Square Knot:

- Work with 8 strands of rope instead of 4.
- Place the 2 right outside ropes across the 4 center ropes. (Always start with the right side.)
- Run the 2 left outside ropes over the right outside ropes then under the 4 center cords and up through the opening.
- With the outside strands, gently tighten the knot.
- (Now repeat the first four steps, starting with the left side this time.)
- With the outside strands, gently tighten the knot.
step 3 – macrame pattern
Now that you have 28 Lark’s Head Knots tied onto your pole, and you’ve mastered the Square Knot, it’s time to begin weaving the wall-hanging. The project consists of 25 total rows.

- Start with 1st cord: 14K
- Start with 3rd cord: 13K
- Start with 1st cord: 3K – S4 – 6K – S4 – 3K
- Start with 3rd cord: 2K – S8 – 5K – S8 – 2K
- Start with 1st cord: 2K – S2 – 1DN – S2 – 4K – S2 – 1DN – S2 – 2K
- Start with 3rd cord: 2K – S8 – 2K – S4 – 2K – S8 – 2K
- Start with 5th cord: 2K – S4 – 2K – S8 – 2K – S4 – 2K
- Start with 7th cord: 4K – S12 – 4K
- Start with 9th cord: 3K – S16 – 3K
- Start with 11th cord: 2K – S20 – 2K
- Start with 13th cord: 1K – S10 – 1K – S10 – 1K
- Start with 11th cord: 2K – S20 – 2K
- Start with 9th cord: 3K – S16 – 3K
- Start with 7th cord: 4K – S12 – 4K
- Start with 5th cord: 2K – S4 – 2K – S8 – 2K – S4 – 2K
- Start with 3rd cord: 2K – S8 – 2K – S4 – 2K – S8 – 2K
- Start with 1st cord: 2K – S12 – 4K – S12 – 2K
- Start with 3rd cord: 2K – S8 – 5K – S8 – 2K
- Start with 1st cord: 3K – S4 – 6K – S4 – 3K
- Start with 3rd cord: 13K
- Start with 1st cord: 14K
- (Begin this row about 5 inches lower than the last row.) Start with 1st cord: 14K
- Start with 3rd cord: 13K
- (Begin this row about 5 inches lower than the last row.) Start with 9th cord: 1K – S8 – 1K – S8 – 1K – S8 – 1K
- (Begin this row about 4 inches lower than the last row.) Start with 3rd cord: 1K – S8 – 1K – S8 – 1K – S8 – 1K – S8 – 1K
step 4 – trimming the bottom
Place the wall-hanging on a flat surface (I used the floor) and straighten all the cords. With careful measuring, place the tape across the strands of cord to form a “V.” This is your guide for cutting. (And yes, it does feel a bit like you’re giving Cousin It a haircut.)

step 5 – finishing touches
For an extra Bohemian touch, I used ceramic drawer pulls as finials, screwing them into the ends of the pole.

extra tips & explanations
When skipping space between rows, use tape as a guide and a level to make sure they are even.


Once you are finished, grab a glass of cold iced tea, kick your feet up, and admire your handiwork!


I love the way this looks in my guest room!
IF YOU LOVED THIS PROJECT, YOU GOTTA TAKE A LOOK AT THESE!
- See how I actually fooled my guests with this Faux Brick Wall
- To add an easy, hip touch to modern decor I made these Leather Strap Shelves
What does 1DN mean
Double Square Knot (it’s shown in the key) and you can go to the link to see how it’s done in the macrame section. But I just realized it should technically be DK because knot begins with K not N! lol Sorry it wasn’t more clear.
Hi Wendy,
Wasn’t going to read over 100 comments, so I hope this wasn’t asked ……in the very top/beginning of this, it shows a plant in a twisted up hanger. Where are the instructions to that project?
hmmm.. I viewed the post and don’t see anything like that. Wonder if it could have been a popup ad or something? sorry.
I’m also wondering the same thing!!! 😕
Where do you get the rods for the wall hangings. I’m 82, I can’t crochet anymore because my hands shake,but I can work the cords with my fingers ok. I’m loving macrame. I love your tutorials. Many thanks Nana
Hi Nancy, That’s great you want to give macrame a try! You can use anything for the rods. I usually buy wooden dowels from Lowes or Home Depot. They will even cut them for you. You can also use wooden drapery poles.
Hello Wendy….thank you so much for this free pattern. I now wish I would’ve saved all of my moms books!! I got bored with crocheting abd decided to start macrame. I have torn this project apart a few times, and I’ve read thru all the comments and I’m stumped lol do you always start the next row of project from the left and work toward the right? Or am I missing it and it zig zags left, right, left…..it is not looking like the pictures…thank you in advance!!
yes, you always start each row from the left and work towards right. Hope this helps. After you finish your first project, it all gets much, much easier!
I love this tutorial for macrame wall hanging! The pattern is beautiful. Can’t wait to try it out.
thank you so much!
Hey Wendy I love your Macrame Wall hanger however I cant seem to find the free pattern etc. Can you help me as I would love to give it a go.
Here is the link for the tutorial.https://www.myfrenchtwist.com/macrame-wallhanging-for-beginners/
As you go along, you can also refer to the knot techniques – just go to the Macrame page on my blog. Good luck!
Do you make this from a hanging position or at a flat surface? If from a hanging position what did you use to do that? Just put some nails in the wall or what?
from a hanging position. If you don’t have a rack or place to hang it, you can even place the ends of the wooden pole on the back of two chairs.
I’m new to macrame and made the hanging this weekend. It looks great!! Except that I’m left wondering whether I misunderstood some of the instructions? I cut 28 strings at 16 ft per and had SO much length left over – like 4 feet on each length! It’s such a waste and macrame cord is not inexpensive. Can you tell me what I did wrong?
Hi Julia, it’s been a while since I’ve made that wall hanging, but I’ll go back and remake it to make sure of the length. You are right, macrame cord is not cheap! Thanks for the input.
Thank You, Wendy. This is a great tool. I am using this to teach my younder sister.
Thank you Wendy! This has been a great teaching tool! I’ve made this 3 times now using it to teach my granddaughter and I how to macrame.
Thanks Michele. Glad you’ve enjoyed it!
I am wondering if the beginners wall hanging can be shorter than what is shown. The width should be fine but I feel it might be too long for the spot I am thinking. Could I cut the cords shorter than what the pattern says or will it look out of porportion? I would like to keep waste to a minimum so would prefer not to cut after. Thank you for your help!
Thank you so much for the written pattern I didn’t make your pretty piece (though I intend to) but I had done a v shape on my own and wanted to go back out to full rows and I was having such a hard time figuring out how to get back out from the middle. I’m still new to macrame so I was confused about where to start to go back out. I looked at your notation and was able to adapt it to my piece (I only had 40 hanging cords). It actually took less time than I thought to figure it out and I’m happy because I think I can now try to do a pattern first on paper so I don’t end up with something way off than what I intended. So again, thank you!
Hi, I love this wall hanging and have tried to do it. I have had so many problems with getting the tightness of the knots correct to get it to balance out. Is there an easy way to get it to flow correctly? I’ve had to take it apart so many times.
Thanks
Oops! Looks like the tutorial is for the hanging. Sorry! But is there one for the planter hanger?
Chris, go to the macramé page on my blog and you will see all the tutorials I’ve posted. Thanks!
Hi Wendy, the wall hanging is beautiful. Takes me back to the 70’s! On pinterest is a picture of a macrame plant hanger and says there is a tutorial for that. Is it somewhere else in your blog? thanks, Chris
Hi! I’m from Canada… I cant seem to find the same rod size. What are the other options?
Hi Tracey, You can use any diameter rod that you find; it doesn’t have to be exactly what I used.
New to macrame… as in first project I’m trying. I’ve got the square knot down and have row 1 completed. I am confused about the directions for Row 2 (Start with 3rd cord: 13K) and Row 3 (Start with 1st cord: 3K – S4 – 6K – S4 – 3K). I’m second guessing myself on what this means!
I am having the same issue also and can not find a reply to your q? Was there one?
It’s been years since I used to macrame plant hangers, but my daughter was wanting a macrame wall hanging so I decided to give it a try. What fun!! It only took me a few hours and was done! I do have a question. I have not yet cut the tails. It feels like the knots could start to loosen or come apart with time. Is there a way to finish the bottom so that the knots will definitely stay knotted?
Hi! I LOVE this design and would love to make it, but the space I have would only fit a 20 inch wide piece with 1.5 inches of dowel either end (tiny house!). Length wise it would be fine but I have no clue where to start with making it narrower?!
Hi Amy, I will be posting a tutorial on custom sizing a simple macrame wall hanging next Friday the 21st. I think that will answer your questions.
Fab! Thank you!
Hi I am trying to do 2 window hangings approx 6” x 65” any idea on a pattern? I am not sure how much cord or a good design.. any help would be greatly appreciated 😃Nancy
Only 6 inches wide? and 65″ long? If it is that narrow, I’d just stick to simple Alternating Square Knots.
Can you please post a bigger picture of the wall hanging? I can get to row #11 but mess up on row #12. I cant get 2,3,4 knots to triangle out from the one knot in row #11. Can you explain or is there a video? Or a larger picture? The wall hanging is beautiiful but I am only having success with half of it. Any further instructions would be appreciated
Can you please post a bugger picture of the wall hanging? I can get to row #11 but mess up on row #12. I cant get 2,3,4 knots to triangle out from the one knot in row #11. Can you explain or is there a video? Or a larger picture? The wall hanging is beautiiful but I am only having success with half of it. Any further instructions would be appreciated
This was my third macrame project, but I just picked up macrame a couple weeks ago when I hit my quarantine DIY phase, haha. For mine, I changed a few things based on what I had on hand:
1) I used a 2mm cord (instead of 3/16″ or 4.76mm)
2) I used a 12-inch dowel. The dowel was pretty small, 0.5cm in diameter.
I was originally gonna try to do half the size, but didn’t wanna deal with trying to half the pattern and mess it up. I couldn’t get 2 dowels to glue together, but the cords were small enough to fit on the 12-inch dowel.
3) Because of the half-size idea, I cut the strands to be 8′ (instead of 16′) and started out with 14 strands, but when I realized I couldn’t convert the pattern myself, I just cut 14 more strands to have 28. I still kept them all at 8′ (since I’d already cut the 1st 14 strands that length.)
4) On Step 25, I did the row 2.5″ below instead of 4″ because the overall width-height ratio was starting to look odd.
Besides that, I measured pretty precisely when cutting the V shape. I taped horizontally where I wanted the middle tip to be (10.5″ below the last row.) Next, I measured where the center was (+ double-checked it with other rows) and marked that. Then, I centered a protractor on that mark, used a ruler over it, and marked in pencil (on the wall I was hanging it on) where the V would end. I did a 40° angle on the left and a 140° angle on the right.
It ended up being 2’6″ at the longest point and 2’2″ at the shortest point. It took me about 4 days on-and-off to complete it, plus I wrote down the instructions and marked them off as I went. (Didn’t wanna go to the printer, haha.)
I put it on a dark blue wall next to my bed and I love how it turned out, especially with the color contrast! This was a great pattern and really simple to follow, so thank you!
Great job Rebecca! Sounds like you nailed it! So happy my tutorial worked for you.
When some one searches for his required thing, therefore he/she wants to be available that in detail,
therefore that thing is maintained over here.
Hi! I am going to try this as my first project! I have 5mm macrame. Will this still work or must I have 3/16? Thanks!
Hiya,
This is my first macrame project. Sorry if this sounds like a silly question, but on the key when you refer to individual cords do you mean individual strands??
Yes. A single cord
Hi! I am going to try this as my first project! I have 5mm macrame. Will this still work or must I have 3/16? Thanks!
5mm will work!
Help! I started my wall hanging and it looks nothing like the picture. I am having trouble with literally the first knots- Do square knots need to be done with 4 cords?
Yes. You can see knit tutorials on the macrame page of my blog
Yes they need 4 cords
Help. I started my wall hanging and it looks nothing like the picture!!!!
The first attempt can be daunting. Send a pic with questions if you need to
I followed your instructions to make my first ever wall hanging and it turned out brilliantly! I learnt how to do double half hitches whilst I was doing it so added some on and changed the bottom half of the design slightly – so pleased with it! Wish I could share a photo with you.
Thank you!
Good for you! I would love to see a photo!😊
I sent one to you on email the same day, did you receive it?
I just searched and found the photo. Your work is excellent! You did a fantastic job!
In row 2, how do you start with the third cord? Can you send a graphic? What cords do you do the square knot with? Do you always start with the right side or do you alternate sides?
The wall hanging for beginners is beautiful. With the drawer knobs on the end, how do you hang it? Thank you for sharing the instructions
I actually used two nails in the wall, slightly slanted upward, and rested the pole on the nails.
The hanging for beginners is beautiful. With the drawer knobs on the end, how do you hang it? Thank you for sharing the instructions.
Do you have a download with all the knots used in macrame?? I’d like to have it for referencing to when working on projects.
I have a Macrame page on my blog with all the different knot tutorials.
I guess I have done the knots too right as I’ve finished the directions and the main part of the pattern is only about 4 inches long. O looked at the knots on the pictures though and mine done seem much tighter so I don’t really know how I’ve done wrong… Do I need to in do it all and start again or would it work / look ok to just repeat the pattern? I wish I could post a picture here to get some feedback!
*too tight
Jordan, you can always send me a photo to my email… myfrenchtwist@aol.com
Hi Wendy, thanks for the pattern! I only had enough string for 24 lengths. How can I modify the pattern using 24 lengths instead of 28? Thanks!
Hello Wendy! I bought 75 yards of macrame. Would it work to make it smaller? How would you do that? Thanks so much! I love your design.
Hi! If you wanted to make a wall hanging with only 75 feet total, I’d suggest beginning with 12 pieces which are tied as lark’s head knots (it has to be divisible by 4) and make each piece 6 feet long.But this would be a very tiny wall hanging. It would really be best to buy a larger amount of rope. Hope this helps.
That is very helpful. Thank you so much! Can’t wait to make it.
Hi Wendy,
My girl is trying to do this pattern and has asked for my help. I keep confusing the terms. One rope tied in a larks head knot with two strands hanging down = a cord? Or cord = the group of 4 strands tied in a square knot? And thus an “individual Cord” per the key instructions is half the normal cord meaning?
Neither of us has done this before (obviously).
Thanks!
one cord is just that – one individual strand.
Hi,
I made this and it is wonderful! The last section of the project, the single double knots every 2-4 rows…. when it is hanging the string wants to twist the other way and not lay flat and pretty like yours. I tried un-tying the knots and tying them not so tight but it didn’t really help. Any suggestions?
Thanks!
Thank you for sharing
Wendy, Just ran across your site and you’ve inspired me! I have a square lamp shade that I’ve been holding on to until I could figure out how to repurpose and I think macrame is what it has been waiting for! Since it’s a cube would I treat it the same as I would a circle (work all the way around it) or should I work each side separately? I’d love your personal opinion and please let me know if you need a picture and I can email one. (It makes sense in my head but that’s not saying much. hehehehe)
Thank you!!
Laura
Thank you! Been wanting to do this for so long and your easy pattern made it so enjoyable! Can’t wait for the next project!
Does paracord act the same knot wise as macrame cord? And this what is used for outdoor projects?
Hi Beth,
Yes, paracord could easily be used instead of rope for macrame, and it would be a good choice for outdoor projects. I also like using nylon rope for outdoor projects, as it holds up well in the rain.
Love this. Do you have PDF of your instructions for download? It’s not a problem if you don’t. It would just be easier than writing it all down for saving.
Never mind…I found the key!
Glad you found the key!
Did you explain the abbreviations? I am new at this and wondering where I can find them?
The key is in #3
Hi, I really want to try to make one these! Silly question but can you explain the appreviations? ‘S’ ‘K’ ‘DN’. Thanks!
So this is a dumb question but when counting the skips do you start with the outer string of the knot or the next string in the row. Many do overs!
no dumb questions at all… you start with the next string.
wendy
Love your design!
I want to incorporate this design into a macrame for my wedding arbour. If the arbour is 2.15m (7ft) wide, and 2.10m (6.9ft) long and hoping for the macrame to end at around 1.5m (4.9ft), will I need around 560m (1837ft) of rope, or have my calculations gone haywire?
Hi Kate, I’m awful at math, but I think for this wall hanging to be 7 ft wide and 5 ft long, you will need 112 pieces of rope (remember, the number of pieces have to be divisible by 4) that are each 240 inches long. That would equal 2240 feet of rope total. This is MAXIMUM amt, because I always have some left over when I make a tapestry. Better safe than sorry. Hope this helps.
I’m just starting out and am wondering when the pattern calls for a knot, it’s a full square, not half, correct? Ive had to start from scratch a few times.
yes, it is a full Square Knot. 🙂
Thank you! I keep running out of cord length at about step 5. I’ve cinched up my knots but still coming up short. Any ideas?
sorry didn’t respond earlier. You can always send me a photo of your progress; that way I can understand better what’s going on. 🙂 send photo to myfrenchtwist@aol.com
Hi Wendy, I love this super easy pattern however my (almost) finished product is missing the single knot in the middle of the centre diamond and I can’t work out where in the pattern this one single feature I or is. Could you please let me know which step number and I can unwind back to that point? Thank you!
I’ve made that mistake before, too. To unwind is tedious, because you have to unwind every single knot in every single row to get back to that row. I’d almost say forget about the center knot. The wall hanging is still adorable and no one will know! If you are a perfectionist, I think it is row 11 you need to return to.
I definitely forgot the center knot and it still looks great 🙂
Thank you!
Thank you!
Thanks Wendy!
Hi Wendy. I’m going to make this beginners wall hanging. I’ve found a site in Australia (where I live) that sells cord reasonably cheap. They have 2 types. I asked them what the difference was. This was their reply……The generic sash cord is an unbranded product imported from china. It is a somewhat looser weave and a little softer than the Donaghys Brand of rope. Both are 100% cotton. Donaghys is a brand name and of slightly better quality…… My question is, should I use the looser weave generic cord or the Donaghys better quality? Which one do you think will be easier to work with? Thank you an advance 💖💖
Without seeing them, it is hard to say. If this product is going to be displayed prominently, then I’d go with the higher quality. If it is just a learning project, and the price difference is substantial, then go with the cheaper. More importantly, unless being used outdoors, I prefer the look of cotton rope better than nylon. Hope this helps.
Thank you. I did go with the better quality cotton one. I’ll let you know how it goes.
Please do, and I’d love to see a picture when you’re done. 🙂
Thanks so much for taking the time to translate this! I’m excited to try it–I used to make hemp necklaces when I was in high school all the time, haha. I want to use a piece of driftwood I found as the “dowel”–it’s probably 2, maybe 3 inches around. Will this affect how long I should cut the strands? Any guesses on how much extra material I might need, or how long the rope should be cut? Thank you!
You can probably get by with the amount suggestion given. Using a piece of driftwood shouldn’t make too much of a difference.
Hey! It seems that in the picture of the finished product, your double knots do not switch directions, but it looks like you start with the right two cords two times in a row. Is this true?
Hey Kristen! I see what you’re asking, but I’m pretty sure I switched cords. Refer to the section in the tutorial on tying a double knot and just follow that. (not saying that I don’t make plenty of mistakes! lol)
I kind of like the way it looks better 😉
Great! that’s what’s fun about macrame… you can invent as you go along.:)
Hi, I want to add a second colour. Any tips how I could do this please? I was thinking of doing 7 x plain 7 x coloured 7 x plain. So the coloured cord runs down the middle. Would this work?
Thanks
Sorry I meant 7 x plain 14 x coloured 7 x plain
Sure! The beauty of macrame is that you can play around with it and sometimes create surprising effects you weren’t expecting. Go for it!
Hi, love the macrame, two questions, how did you hang it? While you were working on it did you have it on the floor or somehow suspended? Can’t wait to try it, thanks!!
Thanks Jodi. I hung the wall hanging by simply putting 2 nails in the wall, sticking out a little bit. Then I propped the pole on top of them. The rope weaving camouflaged the nails nicely. While working on wall hangings, I used to place the pole across the top of two chairs or on anything tall, because it does need to be suspended. You can also hang it over a door. Now I have a rod hanging in my studio with S hooks so I can place the rode onto them. Hope this helps.
What type of Store carries cotton cord? I am in Ohio and can’t find macrame cord so I can get started
I have just started making this using 3 mm cord. I cut it about 10’ Long, so I have no idea If the cords will be long enough, but I’m not too concerned. It’s a fun learning experience. I made a few macrame planters as a pre-teen in the 70’s and liked it. It is so fun that it is popular again. I am finding that my wrist gets sore from ‘nothing, but I blame that on computers and mousing. Thank you for providing the tutorial. I’ll share a pic if it works out. 😀
Great step by step tutorial for someone like me that has never tried macrame!
Thank you for making it so easy to make my first macrame creation! I’m so pleased with how it turned out! How did you attach it to the wall without any nails showing?
Hi! I love this pattern and would love to make it myself as a hanging headboard behind a queen bed. The beds are typically 60″ wide, and based on your other comments the original macrame is 22″. I was thinking I should triple it, but would love to have the inner diamonds be continued too, so that would be a bit more detailed than just the pattern done three times. I am trying to figure out how to best edit the pattern. Do you think that it will about 66″ if tripled? Also, are there adjustments in the pattern I should make to make sure it works out properly?
I just finished making this and I love it! Thank you so much for this SO easy to follow pattern! I have done a few smaller wall hangings and lots of owls, but never one this size because I was overwhelmed by the patterns. Thanks again so much!
I’m so thrilled to hear you followed my pattern! 👍
Hi Wendy, i admire your work.. being a beginner right now i can only dream to make somethşng like this.. but i will try.. can you tel me what length of a finished work will a 16ft cord make… i mean if i want to make a piece 50 inches long what should be the cord measurement..
Thank you..
The wallhanging in this tutorial ended up being 48″ long, and I started with rope pieces 16 feet each. It depends on how many rows of knots you have. I would suggest using rope cut into 17 ft. pieces just to give you a little extra to work with. Hope this helps!
Loved this hanging. How would i go about making it 2x as wide and 1/3 % shorter?
Hi Audrey, Glad you liked the wallhanging pattern. To make it wider and shorter, I suggest just duplicating the pattern a second time. So instead of starting with 28 rope pieces, you would start with 56. Shortening the hanging is easy. Just stop weaving when you get it to the desired length. If you need me to write out a second pattern for you to follow, I will. Just let me know!
Hi Wendy
Love this hanging. I am trying to double it as suggested above, but I don’t think I’m as clever as I thought! The middle between the two sections doesn’t seem right. I have undone some rows and starting again, but wondering if you did do the second pattern as mentioned above and if I might be able to get a copy please? Thanks 😊
Are you trying to make the wall hanging twice as wide? If so, I think I have a pattern written out to do that. Give me today to dig that out and send it to you. thanks! Don’t give up – it will be worth it once you finish!
Hi Wendy, I am wondering how I would make this pattern fit if I only have 100 feet of cording. How many pieces should I cut and how long should I make them? Thanks so much!
Hi Sophie, I don’t think you’ll be able to make this pattern with only 100 feet. That’s only a fifth of the amount I used. Sorry!
Hi! I am currently in step 4 of this project and I’ve double checked my work so far, I am one cord short for the 2nd knot on the end of the row! Don’t know what to do! Please help!!
Hey, We have been trying to follow your directions but it seems there may be steps missing as we have followed step by step twice and still missing some of the pattern. Can you please help…. We can send a photo. lol
Thanks
Absolutely I’ll help you can send a photo
Send to myfrenchtwist@aol.com if that’s easier
I appreciate all the work you put in5o making this possible. Did it at home and it’s beautiful
It’s always so heartwarming to receive comments like yours. I’m sooo glad someone put the tutorial to use! Would love to see a pic! thanks!!!
This is really cool! I’ve never actually done macrame, but it reminds me of the friendship bracelets I used to make as a kid. Thanks for sharing this at #HomeMattersParty
Thanks for sharing your creativity with us at Waste Not Wednesday. I hope to see you again each week.
you’re welcome!
I remember my mum macrameing!! She loved to make hanging pot plant hangers and wall hangings like yours! I will have to give this a try! So clever.
wow you are so talented! I love that these are making a come back! They remind me of when I was a kid 😉 oh and you were our most clicked on link at Waste not Wednesday so you will be featured in our posts this week!
Wow! Thanks so much!!
This is amazing!! Im just wondering what the height of the final creation would end up at? Im looking to make something for my daughters room and this is so stunning, just not sure if it will be too long. Thank you and thanks for sharing!
The woven project is about 22″ wide and 48 ” tall. You can always shorten it to suit your needs. It would still look cute without such long tails.😊
Oh my goodness that is so beautiful.
Thank you for stopping by and sharing at #HandmadeMonday we are really please to have you join us and share something so pretty.
Sure! And thanks for stopping by my blog!
Hi Wendy, just to let you know your lovely wall hanging is one of the #HandmadeMonday features this week 🙂
Wow! Thank you so much!
My mum used to make macrame plant holders in the 70’s. I keep on meaning to give it ago. Your wall hanging looks lovely.
I loved making macrame plant hangers in the 70’s. I’ve rediscovered it recently and I’m loving it again! Your wall hanging is beautiful. Thank you for sharing it.
Thanks so much!