I shared this project quite a few years ago, but it’s worth reposting. Of all my DIY projects, this realistic faux brick wall has been the one of which I’m most proud. The biggest investment in this project was not supplies but time.
Here’s the scoop on how I transformed a plain white wall into a beautiful brick one. My son bought his first condo – a small third floor abode in a beautiful historic home built in the late 1800s. It was the perfect palate to showcase an interior brick wall, so with about $80 in supplies and a willing mom, he now has a radical piece of character in his small living space.
(This post may contain affiliate links for your convenience; as a participant in the Amazon Services LLC Associates Program, I earn from qualifying purchases. See disclosure here.)
STEP 1 – BASE COAT OF PAINT
First, we painted the wall with a shade of gray paint. Any sheen is fine, as long as the color is similar to grout. A quick coat of paint is all you need.
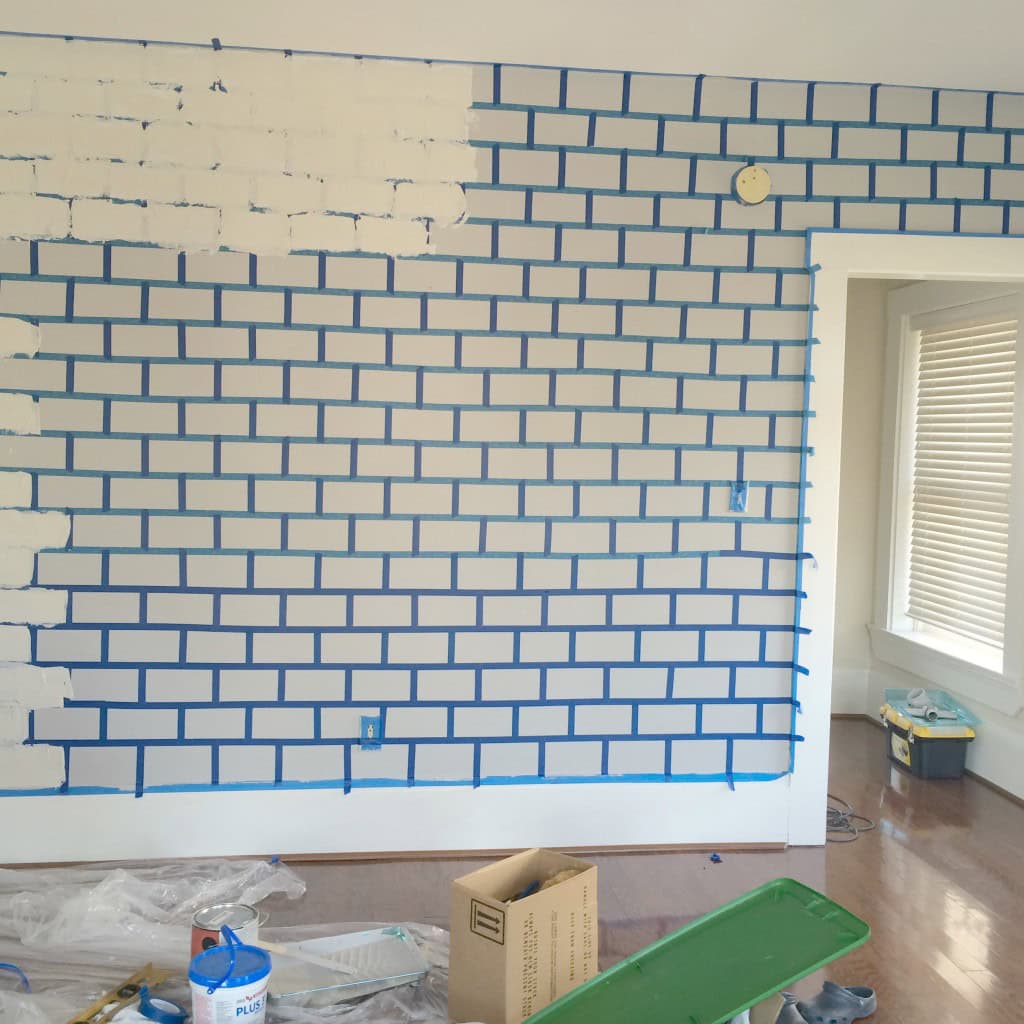
STEP 2 – TAPE
Next, using a level, pencil, and several rolls of painter’s tape, I gridded off a brick design. The “bricks” measured 4 inches x 8 inches. I didn’t worry too much about precision, because old brick walls (especially in historic homes) are quite irregular. I didn’t worry about pencil marks, either, because the finished product is so layered, they won’t show.
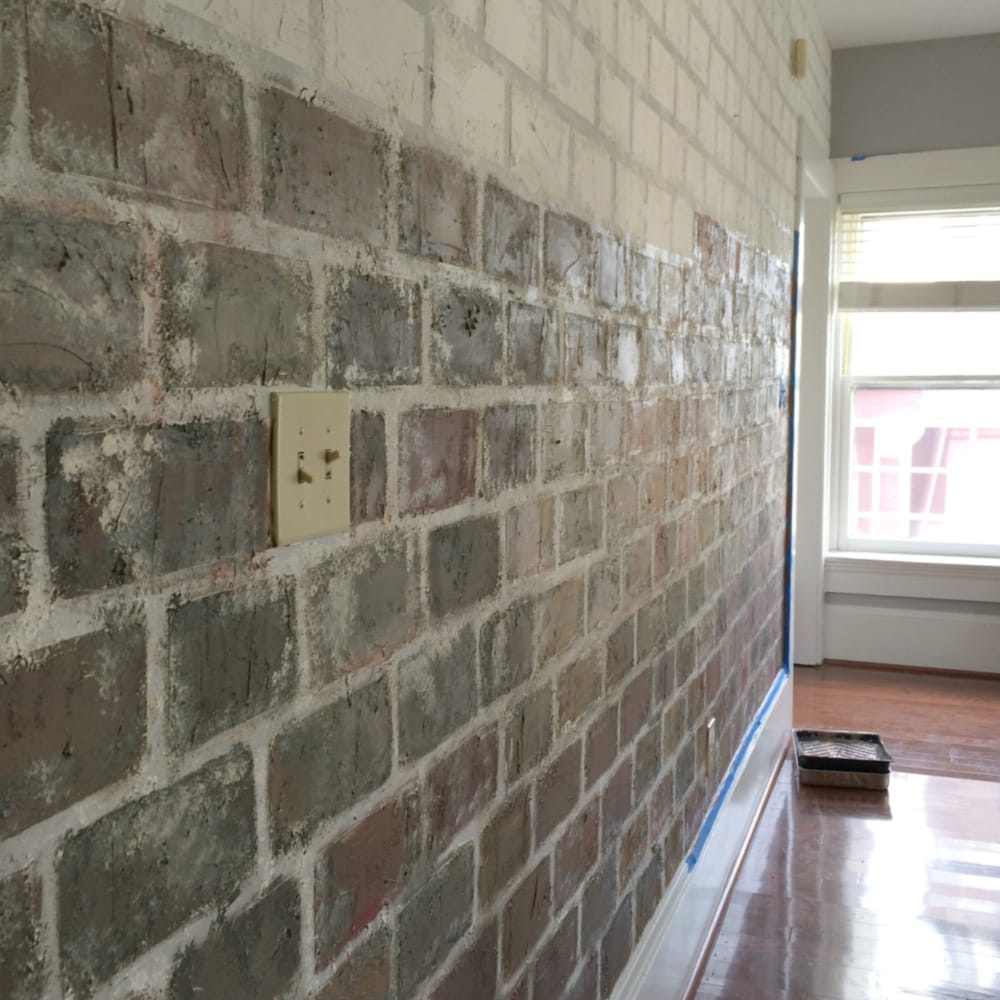
STEP 3 – STUCCO
Once I had finished taping, I applied pre-mixed drywall compound to the wall with A spreader. I was going for an old, rustic look, so the messier the better. Some bricks I made thicker than others.
During the time I worked on this wall, I found myself studying brick walls whenever I passed an old house. I live in an historic neighborhood, so as I walked my pug several times daily, I took mental notes on all the irregularities and nuances of old brick.

STEP 4 – TAPE REMOVAL
First, let me say that there are two schools of thought at this junction. Some folks prefer to paint the wall a brick color before removing the tape, but I opted to paint each brick individually after tape removal. I believe you achieve a more authentic result this way.
As far as tape removal goes, you can wait until the compound is completely dry or you can remove the tape while it is still damp. You’re talking to a person here that opens and re-wraps Christmas presents to myself so no-one will suspect I checked them out, so of course I didn’t let the stucco dry! I removed the tape immediately. This is the point at which you will see how beautiful the wall is becoming.

STEP 5 – SPONGING
After I removed the tape, I then dampened a sea sponge and stippled more drywall compound onto the wall, especially onto many of the grout lines. This helped to soften the rigidity of the grid lines and to give the wall even more texture. I even created some lumpy areas to mimic authentic, old crumbling walls.
STEP 6 – PAINTING THE BRICKS
Here is where it gets tricky. I bought small quarts (I didn’t even need this much, but this was the smallest amount I could have mixed) of the cheapest paint available at the paint store in the following colors:

I poured a little of each color onto a tray and painted the bricks individually by mixing the colors as I went along. I used a cheap 2-3″ wide paint brush. I first painted color onto a section of bricks quickly, not worrying too much about “going outside the lines.” Then I went back over those bricks with “stipples” and “dabs” and “brushes” of other colors. Some bricks I painted predominantly gray, others brownish-orange, still others mostly white. You do need an artist’s eye to make sure the bricks look natural and convincing, but have fun with it too! Be cautious about using too much red, as it will make the bricks a saturated wine color. I never would have thought to use aqua and orange, but those colors mixed in with neutrals create much more realistic bricks than typical red or brown.

STEP 7 – MORE SPONGING
Once a section of bricks was painted, I used my sea sponge again dipped into my paint colors to add even more texture. I used predominantly whites to soften the brick edges and blacks to add depth to the bricks themselves.
STEP 8 – FINE TUNING
This step may seem so minor that you’ll want to skip it, but I believe sometimes the smallest nuances create the most realistic touches. I used a small artist’s brush dipped in white paint to add some very fine straight lines to the brick edges. Especially in some places, where there were lots of “grout” and/or color in the grout lines, I added definition to the brick edge with a fine white line.

STEP 9 – USE THE LEVERAGE
That’s right. Hold this labor of love over the recipient’s head for as long as you possibly can. I told my son this was his birthday present…. and Christmas… for this year… and the next…
Now, when he decides to clean up his new condo, I’ll get more professional looking photos for you!


The biggest compliment is a little share – pin the photo below!
![]()
Stunning transformation! I’m glad you reshared the post. It will be a feature post this week. #HomeMattersParty
Beautiful! I have wanted a “brick” wall in my house for years. This gives me hope! I love it!
Glad it inspired you!
This looks like a super DIY; thanks for sharing. I’d like to add the look of distressed brick in our lower kitchen/bar area. I was thinking of using peel and stick faux brick wallpaper, but the walls are heavily textured and it might not stick (plus my daughter thinks the wallpaper would look like an amateur school drama set)! If I used your method of painting on the already textured walls, do you think adding more texture with the joint compound prior to painting is still necessary? Thanks!
No, not prior to painting the background color, because once wall is taped off you can add as much or little texture as you like.
Looks amazing Wendy, so unique. Thanks for sharing at Love Your Creativity.
THanks! It was indeed a labor of love.
Amazing, what a labor of love and awesome job you have done.
Thanks so much for participating and sharing at SSPS 304. See you again next week https://esmesalon.com/tag/seniorsalonpitstop/
Thanks so much!
I would not have believed that this was not a real brick wall if I had not come to take a look at your post. The wall looks amazing!
Thank you for sharing this article.
This looks great and I like the coloring more than other tutorials. Can you explain a little more how you painted the bricks? Were the colors mixed on the plate or on your sponge?
I actually mixed the colors on a plate and used an artist brush to paint each brick individually. Then I added depth to the each brick by dabbing colors on with a sea sponge. It was a very free -handed effort with a lot of dabbing and going over and over. I actually studied old brick building and houses in the neighborhood while I walked my dog and saw new ideas each day.
I’m curious if you had considered adding pigment to the plaster before you applied it?
no I didn’t. It certainly can be done, but I thought it looked like cement without tinting.
This looks great Wendy! Did you use a primer on the “bricks” before painting them? Also, would you be able to tell me approximately how many sq. feet you covered with your joint compound per gallon? TIA.
I did not use primer on the bricks. I first painted the wall gray, then after taping off the “bricks” I slapped joint compound on the wall and when dry I painted them. Can’t remember the amount I used… just a bucket of premixed compound and that was all I needed for the wall. Not very scientific! sorry!
What was the width of the tape- looks like the .7 inch?
That’s about right.
Hi Wendy, thank you very much for the step by step instructions. My wall came out beautifully.
I love to hear that!!!
Gorgeous!!!! My Mom and I (years and years ago) did a faux brick above her stovetop, using a rectangular sponge dipped in shades of tan/red/etc. and I have always LOVED this look SO much. I am considering doing a faux brick on my dining room chimney wall (chimney behind plaster wall). 🙂
Thanks so much Amy!
Would it have been easier to add the color while the tape was still on? I love this idea, but I have zero patience when it comes to big jobs 🙁
It may have been, but in retrospect I think the way I did it made for a more authentic look. However, it was NOT the quickest and easiest way! lol!
I’m thinking about trying this and leave the tape in place through step 6, pull the tape, then finish the individual bricks with the rest of the steps. Thoughts?
I think that would work well. It’s a very forgiving process when you are making the bricks look aged. Go for it!
Hello webmaster, i’ve been reading your articles for some time and I really like
coming back here. I can see that you probably don’t make money on your site.
I know one cool method of earning money, I think you will like
it. Search google for: dracko’s tricks
That brick wall was a big project and you pulled it off beautifully. Thank you for sharing with us this week at Celebrate Your Story, have a great weekend.
Thank you!
I would never have guessed this was not real brick! What an amazing job! Hooray, hooray! I have shared this over on FB! Thanks for sharing at Celebrate Your Story!
Thanks so much Chloe!
OH! I just love this! Thanks for sharing at the #HomeMattersParty!
Thank you!
That’s amazing, definitely worth several years Christmas and Birthday presents. I love that you’ve been studying bricks where ever you walk too – actually you can see your attention to detail in the finished project.
Thanks Julie!
Awesome tutorial and a great looking brick wall. I hope your son appreciates all your hard work!
Thanks and yes he does!
Wow! It looks so realistic! That’s a very clever little trick.
Thanks so much!
We have a bright white faux brick wall, I painted with brown the bricks. It’s not pretty. I would love to work on making the bricks more realistic!
Your wall is beautiful, and it inspires me to really make our basement brick beautiful too! Thank you!
I’m so glad! Would love to see pictures!
That is truly amazing! It looks so real! I never would have thought that was just drywall compound and paint. You did a great job!
Thank you so much!
Wendy, I am obsessed with brick walls. I cannot believe this is not real. You should win the best mom award for this wall. It is that good!
Thanks so much! It was a labor of love
The brick wall is absolutely the most amazing and creative transformation of a wall that I’ve ever seen!!!
You are an inspiration to all!
Glad that you are back blogging. Love the brick wall, I would never have thought of creating my own faux brick wall. It definately adds interest to the the room, great tutorial. Look forward to seeing your up an coming posts.
Thanks Claire! Glad I’m back too: life has a way of keeping us so busy!