
If machine embroidery makes you think of preppy monograms or choo-choo train bibs, think again. With a bit of artistry and the right pattern, your embroidery machine can also make some impressive free-spirited creations that would rival any Anthropologie product. And that’s saying a lot, because I’ve always been an Anthro girl. Just take a look at this machine embroidered boho pillow I made recently.
Raw-edge applique is my favorite technique, as the applique edges soften and lightly fray when washed, adding to the free-spirited flavor. And it’s not difficult at all. I’ll walk you through the steps to show you just how easy it is. You may want to refer to this post first for an overview of the technique.
(Affiliate links included for your convenience. As an Amazon associate I earn from qualifying purchases. See disclosure here.)
supplies needed:
- fabric – solid for front & print for pillow back
- tear-away stabilizer
- embroidery thread
- embroidery machine
- 14″ pillow form
- spray adhesive for fabric
- machine embroidery design – Happy Weekend
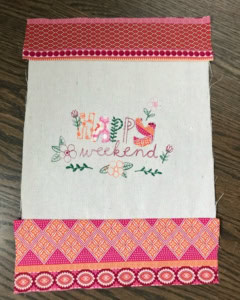
embroidery design – happy weekend
step 1 – cut applique pieces
When downloading this embroidery design, also print the PDF file, which includes the true-to-size applique patterns needed for the project. Cut squares of fabric just a bit larger than the applique templates. If preferred, you can reinforce the fabric with fusible interfacing. I prefer one that isn’t too heavy. Cut these from fabric scraps of your choice. Once cut, place the appliques face down into a shallow cardboard box; lightly spray the backs with a spray adhesive. Set aside until until needed.

step 2 – stitch out design
Once you have the correct format of the design downloaded and loaded onto your machine and the appliques cut, it’s time to start embroidering. This pattern has 24 pattern steps; download this free color file to help with thread selection.

The first pattern step is to stitch the applique placement lines. Immediately after this step, place the cut appliques on top of placement lines and gently press to make sure they don’t slip.

Continue stitching the next 23 steps, using the color file for thread suggestions.


step 3 – trim threads
Using small embroidery scissors, trim all the loose threads from the finished design.
pillow cover
step 1 – pillow front
You can make a fancy pillow with mitered corners, flanged borders, and impressive embellishments…or you can take the lazy girl’s approach and piece together a quick and easy cover the way I did below.
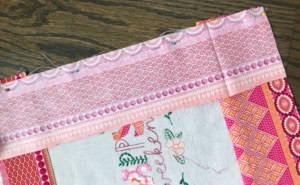
First, trim around the embroidered design to form a neatly cut?? square with the design carefully centered. Place a strip of fabric onto the square, right sides together, across the top and the bottom, and stitch with a straight seam. Press open.
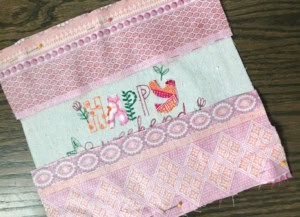
Next, place two more strips of fabric onto the sides of the square, right sides together, and stitch in place with a straight seam. Press open.
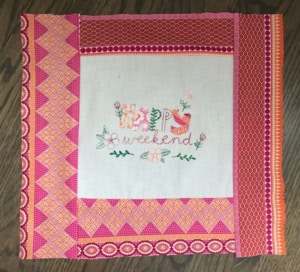
Now that borders are added to all four sides, cut the pillow front down to measure a 14″ square, keeping the design neatly centered.
step 2 – pillow back
To make the pillow back, refer to this post, explaining the steps. Once completed, insert a 14″ pillow form into the cover.


Don’t forget, this embroidery design can be stitched onto lots of different products. Although I’m partial to this funky, little pillow, I’ve also used it on a decorative tea towel.

The biggest compliment is a little share – pin the photo below.


thanks for sharing a great idea with us.
Thank you so much for awesome designs. I will definitely try some of them. It look amazing and i love the way you wrote the article and the pictures are good too. Thanks alot.
Perfect timing for this post! Appreciating the time and effort you put into your website and in-depth information you offer. Worth sharing! Please do continue sharing updates! Thanks a lot!
Thanks Cara!
thanks for the amazing article, details, and motivation! This gives me hope. I am going to study those articles. Have a good day!
Hello there! I could possibly have sworn I’ve visited this web site before but after looking at several of the posts I realized it’s a new comer to me. Anyhow, I’m certainly pleased I discovered i and I’ll be bookmarking it and checki g back often!
Thanks for nice and informative post you shared. I must try this.
Hi Wendy !
Thank you very much for sharing beautiful embroidery of pillows. I’ll definitely try this 🙂
Hey, Can you share the embroidery machine buying guide for making this amazing design pillow? Thank you
If you go to the shop / shop my studio page on the blog you will see the home embroidery machine that I own and like best.
This is beautiful, it’ll be one of the features at Handmade Monday week.
Thank you Julie!
Love the pillow. The embroidery is really sweet but I also really like the fabric you chose for the back.
Thanks Claire!