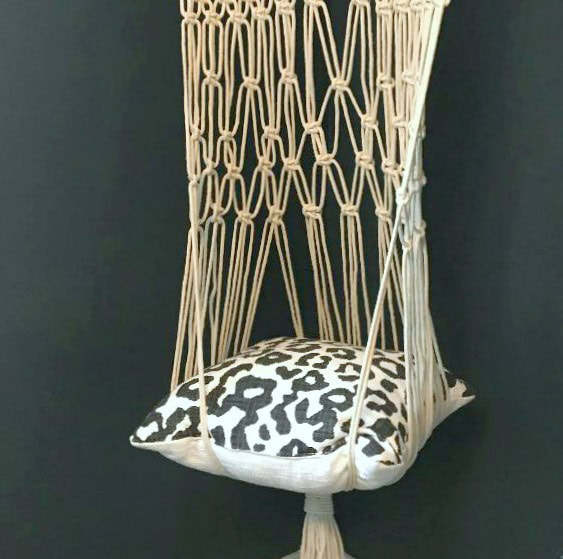
I have no cat, okay? But I promised my readers I’d give them a tutorial for a macrame cat hammock, so here it is. Besides, it turned out so sweet, it almost makes me want to adopt a kitten. Almost. Another nice thing about this hammock is that it’s comprised of mostly Square Knots, so it’s easy enough for macrame beginners.
(This post may contain affiliate links; as an Amazon associate I earn from qualifying purchases. See disclosure here.)
supplies needed:
- masking tape & scissors
- 24″ long wooden drapery rod (1″ diameter) with two finials
- Five 100-foot rolls of cotton clothesline (3/16″)
- 18″ square throw pillow
getting started
Cut 24 pieces of rope, each measuring 20 feet long. Wrap a small piece of masking tape around each end of rope, to prevent fraying while weaving the design.
lark’s head knots
Once the 24 rope pieces are cut and ends are taped (to prevent fraying), tie each one to the wooden pole using a Lark’s Head Knot.

square knots
You now have 24 Lark’s Head Knots tied onto the pole and 48 individual cords hanging. To follow the instructions correctly, you need to understand the following key. While knotting, try to keep each horizontal row even, and always go from left to right. To make a proper Square Knot, see the tutorial here.
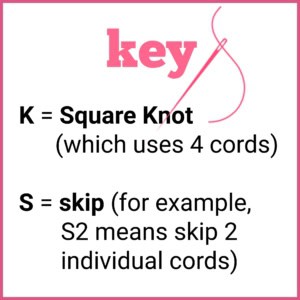
- Start with 1st cord: 12K (starting with 1st individual cord from the left, tie 12 Square Knots)

- Start with 3rd cord: 11K (starting with 3rd individual cord from the left, tie 11 Square Knots)
- Start with 5th cord: 4K – S8 – 4K
- Start with 7th cord: 3K – S12 – 3K
- Start with 9th cord: 2K – S16 – 2K
- Start with 11th cord: 1K – S8 – 1K – S8 – 1K
- Start with 9th cord: 2K – S16 – 2K
- Start with 7th cord: 3K – S12 – 3K
- Start with 5th cord: 4K – S8 – 4K
- Start with 3rd cord: 5K – S4 – 5K
- Start with 1st cord: 12K
- (Begin this row about 4″ lower than the previous row.) Start with 5th cord: 1K – S2 – 1K – S2 – 1K – S2 – 1K – S2 – 1K – S2 – 1K – S2 – 1K

- (Begin this row about 3″ lower than the previous row.) Start with 2nd cord: 1K – S2 – 1K – S2 – 1K – S2 – 1K – S2 – 1K – S2 – 1K – S2 – 1K – S2

- (Begin this row about 3″ lower than the previous row.) Start with 1st cord: 12K
- (Begin this row about 3″ lower than the previous row.) Start with 3rd cord: 11K


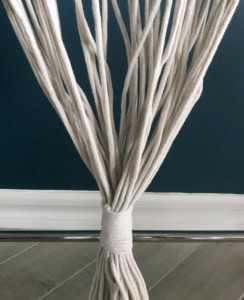
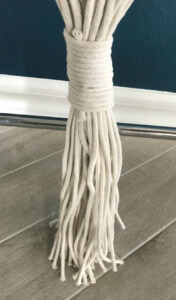
wrapped knot
About 20″ down from the last row of knots, make a Wrapped Knot (using a spare piece of cording). About 12″ below the bottom of the Wrapped Knot, trim the cords evenly.

adding a pillow
Nestle a small cat bed or pillow within the cords just above the Wrapped Knot. Spread the cords evenly around the bed. I used a whimsical 18″ square pillow from Target.

finishing touches
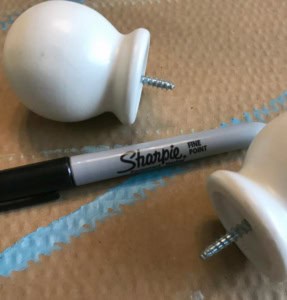
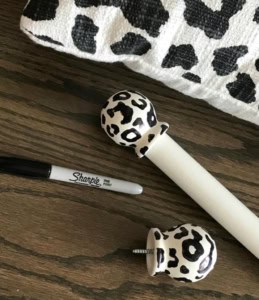
If you cannot find a drapery rod short enough, cut a larger one down to fit. For an extra touch, I mimicked the pattern on the pillow onto the finials, using a permanent marker. To hang the hammock, tie an extra piece of rope onto the two ends of the rod and hang from a ceiling hook.


The biggest compliment is a little share – please pin the photo below!

Need to save this for later?


We hear your words… but this doesn’t apply to everybody’s cat… maybe put something around the inside like a bumper pad in baby cribs- from days of old for your cat ….. just saying…..
I really enjoyed this pattern as my very first project – easy to follow!! Can I please ask for tips on how to lay the cushion in so nicely that it doesn’t slide out when kitty jumps in!!🤦♀️🤷♀️
The only tip that comes to mind is to perhaps stitch a small ribbon to the corners of the pillow, then tie them to the cording on the hammock. Not sure if this will work, but it’s worth a try.
I was given a macrame cat hammock for a gift and my year old kitten almost dislocated her shoulder. Got tangled in the macrame on the sides and got stuck and could not get out. Luckily I was there to rescue her. The one you give instructions for to make your own is exactly the same as the dangerous one. DO NOT MAKE THIS HAMMOCK.
Oh no! I’m so sorry to hear that. I made one for my friend and her cat has enjoyed it with no problems. But I’m always eager for feedback to improve my products.
We hear your words… but this doesn’t apply to everybody’s cat… maybe put something around the inside like a bumper pad in baby cribs- from days of old for your cat ….. just saying…..
Love this. About how far down do you leave before starting each row. Thanks
This is the very first macrame project I’ve done and I completed it in one night (not
including measuring). Thank you!!!!
So happy to hear this! Good job!
My daughter has THREE cats: Leo, Pippa and Jasper. I want to make them a cat hammock (just one – they will have to share)! I was just wondering, if I wanted to add wooden beads to jazz it up a bit, where would I place the beads? Just playin’ around. Macrame is so fun! Thanks for sharing this!
What a clever idea! I would add beads below the diamond designs.
If I want to make cat hammock longer do I repeat any steps or just keep going? I can’t wait to finish this. Thank you so much
Just keep going. Have fun!
Thanks for the tutorial. I adapted the design a little. Since this week my cat jumps in it by herself.
Oh that’s great!
I just love your cat bed. your tutorials are easy to follow. I have already sold 2 at my 1st craft show last week. now im busy making more for next Saturday. Thanks for the help and inspiration. Margo DBA GRANDMAS HANDS.
you are so welcome!
I don’t know what I’m doing wrong but in the first two rows there are 48 strands but when you count the rest of the rows there are 50 strands. Am I wrong about this?
I’m not sure what with wrong without a photo, but that can’t be! It has to continue to be 48 individual cords; my guess is that you are counting incorrectly. This is easy to do if the horizontal rows are not very straight.
How much weight can this hold? I have 2 cats and one is pretty fat. If they are both in at once I don’t want it to come crashing down.
I think they will be fine. I have a very fat pug, so I have experience with chubby pets! lol
You should be fine. I have a very fat pug that tested it. lol
I made this not for myself but for at my sisters they must have 20 cats over there and I thought I would try and make them comfortable, I really like the way it turn out thank you very much
Glad to hear that! Thanks!
Thank you for the tutorial! I used less string and did 16 strands instead. Turned our great 🙂
That’s great! I usually err on the side of using too much cord. Would love to see a pic!
I might worry as cats are by nature climbers that it would try and climb up the rope and get stuck and hang by it’s nails until I rescue it!
I sure hope not! It sure is cute to look at, though.
My cat would LOVE this! Awesome tutorial.
Glad you enjoyed it Paige.
My cat would definitely love this, it looks really nice and it would fit my garden perfectly. I am just not sure if am i that good with hands.
How fun! Thanks for sharing at Vintage Charm!
I love this idea and the boho vibe. Both my kids have cats in their home and I’m thinking this would make a great Christmas present for the cats. No more cat tree taking up valuable space! Pinned
How long is the hammock?
a little less than 5 ft from top to bottom
I don’t have a cat either, but this is so cool! Pinning!
Michelle
http://mybijoulifeonline.com
Thanks Michelle!