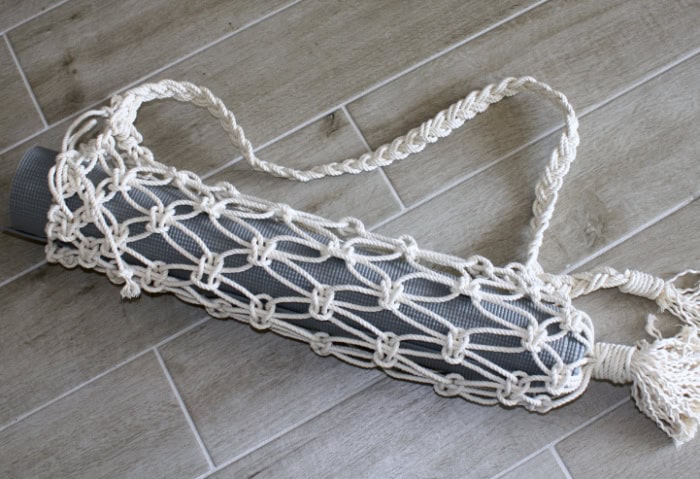
I’ve had requests for a macrame yoga bag tutorial, so here it is. The construction of this mat is very basic, using only the Square Knot.
(Affiliate links included for your convenience. As an Amazon associate I earn from qualifying purchases. See disclosure here.)

supplies needed:
- 3/16 cotton rope – 210 ft.
- masking tape & scissors
(This post contains affiliate links for your convenience. See my full disclosure here.)
step 1 – preparation
Cut 16 pieces of rope, each measuring 150″. Tape the ends with masking tape to prevent fraying. First, tie one of the pieces somewhat loosely around the top of a rolled yoga mat. Make a small knot in the 2 ends to prevent fraying. Keep the two loose strands from this piece separate from the weaving process. This piece will be the top of the bag that will be tied and untied as you place your mat in and take it out.

Next tie 12 pieces of rope onto this first piece, using the Lark’s Head Knot. Space them loosely apart, to ensure the opening of the bag expands large enough to accommodate the mat.

step 2 – square knots
Next, tie a row of 6 Square Knots. I kept the mat upright as I created the body of the bag.

Next, make a second row of Alternating Square Knots.

Continue making rows of knots in this fashion until you reach the bottom of the yoga mat. As you can tell from the photos, I kept my knots fairly loose. (If you want a tighter weave, you will need to cut the rope pieces a bit longer.)

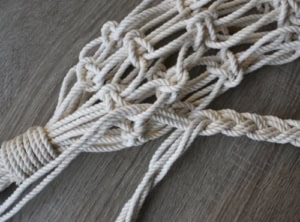
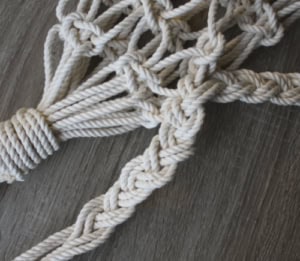
step 3 – wrapped knot
To form the bottom of the bag, make a Wrapped Knot. (You will trim the pieces to the desired length later.)

step 4 – strap
To form the strap, tie 3 rope pieces, using the Lark’s Head Knot, onto the bag about 2-3 inches below the place where the top cord ties.


Next, begin braiding the six strands, as shown below. Near the bottom of the bag (on the same side that the strap was tied), bring 2 pieces of cord through part of the bag, then continue braiding. This is how the bottom of the strap is attached to the bag.
A few inches down, create another Wrapped Knot to finish the end of the strap. Trim the ends of the bag bottom and the strap bottom. And guess what? You now have no excuses… slide that mat into your new macrame yoga bag and go to the gym!


The biggest compliment is a little share – pin the photo below!

wow thank you sooo much
It’s a creative idea and I like the bag! I can’t wait a min. to try this for me. I hope it would be an amazing experience. Do you have any clips on YouTube? It will be easy to try at home. Thanks and keep up the good work!
Glad you stopped by!
Hi, please is it possibility to see measurements in europe standard?
210ft is about 64meters but I dont understand what means if you write 16pieces of 150”? Thank you so much and have a nice day.
Michaela
150″ (inches) equals 3.81 meters. Hope this helps!
How do you find the PDF instructions for the macrame yoga bag?
go to the Macrame page on my blog, click on yoga bag tutorial – second version, and read through the post. You will see a place to click on the pdf instructions for downloading.
Wendy, is there a PDF of the instructions that I can print out? I am not seeing a link to that anywhere.
Penny
Not yet but I’ll b creating one soon, hopefully tomorrow😊
If u go to my website to the yoga sling post, you will see that I just added pdf instructions😊
Thank you so much for the tutorial. Ive seen pictures of yoga bags but never any insruction on making them. ❤👍😀
You are welcome. So glad you’ve found it useful!
This is very cool, I love it.
Could this be adapted to make a shorter wider bag, like a market bag? I wondering if you used a yoga mat but a bit more unrolled so it was bigger would mean a wider bag would be possible. Or would that be too difficult?
Julie, I’m actually planning on posting a tutorial for a market bag soon!
A very cool idea, and a beautiful bag!
Thank you so much!
Thank you soooooo much for the pattern! I have been searching for a yoga mat bag pattern with no success until now! You are awesome!😁😁😁
You are so welcome!!