
As with many of my craft projects, I’ve learned that complicated does not always mean impressive. And once again, that holds true for this sweet macrame wall hanging that only uses one standard knot – the Square Knot. The vertical knotted chains you see are called sennits but are actually just a slight variation of the Square Knot. They’re so easy to do, and they give this tapestry a playful, swinging movement I adore. And the sennits coupled with the purple ombre dye make me think of Spring. Let’s face it, who isn’t ready for a little Spring?
(Affiliate links included for your convenience. As an Amazon associate I earn from qualifying purchases. See disclosure here.)
supplies needed:
- 5mm cotton rope – 612 feet
- wooden dowel – 36″ long
- purple craft paint
- purple dye & blue dye
- painters’ tape
step 1 – paint dowel
Measure off 3 inches from each end of the dowel rod and mark it with a piece of painters’ tape. Paint both ends and let dry. (Note: You’ll see in the following photos that I actually began with a different dowel rod for the tapestry. I later decided to substitute it with a new one with painted ends. Much cuter!)

step 2 – larks’ head knots
Cut 5mm cotton rope into 36 pieces, each measuring 17 feet. Tape all ends of the cords with painters’ tape to prevent fraying while knotting. Attach each cord to the rod using a Larks’ Head Knot. You will end up with 36 Larks’ Head knots.

step 3 – sennits
There should now be 72 individual cords hanging from the wooden rod. Working with the first 4 cords on the left, make a Square Knot. Then continuing making a vertical chain of Square Knots, one right below the other, until you have a total of 5 Square Knots. This chain is called a sennit. Next, make a second sennit with the next 4 strands. Continue in this fashion until you have 18 sennits, each consisting of 5 vertical Square Knots.

Next, using the third, fourth, ninth & tenth individual cords from the left, make a Square Knot (see picture left below.) Continue making a vertical chain of Square Knots, one right below the other, until you have a total of 4 Square Knots in this sennit (see photo right below.) Think of it in these terms: you have just created a new sennit by joining the 4 inner cords of the first and third Sennits.
![]()
Now repeat this process with the fourth and sixth sennits. Then repeat this process once again with the 2nd and 5th sennits, as shown below. This creates a lovely layered effect.
![]()

You’ve now completed a pretty design using the first 6 sennits; we’ll call it Section 1. (See photo above.) You will duplicate this entire design using the Section 2 of the wall hanging (7th through 12th sennits.) And finally, you will duplicate this design a third time using Section 3 (the last six sennits on the right.)
![]()
step 4 – square knots
To follow instructions for the next part, you need to understand the following key. While knotting, try to keep each horizontal row even, and always work from left to right.
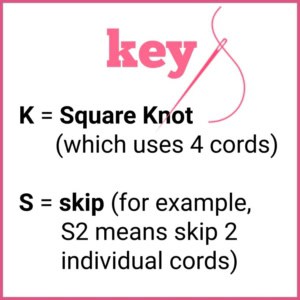
Row 1 – start with 1st cord: 18K (starting with 1st individual cord from the left, tie 18 Square Knots)

Close-up photo below:

Row 2 – start with 3rd cord: 17K (starting with 3rd individual cord from the left, tie 17 Square Knots)

Row 3 – start with 1st cord: 18K
Row 4 – start with 3rd cord: 5K, Skip 4 (individual cords), 5K, Skip 4, 5K

Row 5 – start with 5th cord: 4k, Skip 8, 4K, Skip 8, 4K
Row 6 – start with 7th cord: 3K, Skip 12, 3k, Skip 12, 3K
Row 7 – start with 9th cord: 2K, Skip 16, 2K, Skip 16, 2K
Row 8 – start with 11th cord: 1k, skip 20, 1k, Sip 20, 1K
Row 9 – start with 1st cord: 18K (same as row 1)
Row 10 – start with 3rd cord: 17K (same as row 2)
Row 11 – start with 1st cord: 18K (same as row 1)
step 5 – half square spiral knots
Now add another horizontal row as follows:
Row 12 – starting with the 3rd individual cord from the left: 1 Square Knot, Skip 4 individual cords, 1K, Skip 4, 1K, Skip 4, 1K, Skip 4, 1K, Skip 4, 1K, Skip 4, 1K, Skip 4, 1K, Skip 4, 1K, Skip 2
To give a flirty finish to this macrame wall hanging, I added nine Half Square Spiral Knots, all in varying lengths. Watch this video to learn how easily a Half Square Spiral Knot is tied.

Now that you have a horizontal row with 9 Square Knots spaced evenly, beneath each of these nine knots, you will create a Half Square Spiral. As for length, the spirals in this wall hanging range from 3.5″ long to 13″ long. There’s not set rule; just make them all random lengths.
step 6 – finishing touches
Once the spirals are made, tie random single knots in the loose cords hanging between the spiral chains.

Lastly, I dip-dyed the wall hanging in this fabric dye. (Check out my tutorial on how to easily dip-dye a macrame wall hanging here.) I just love the results! You can now see how knowing just the Square Knot can help you make beautiful variations that bring unique qualities to your wall hanging. I’ve named this purple beauty Fun with Sennits.
The biggest compliment is a little share – pin the photo below!


This is so lovely! Thanks for sharing at Vintage Charm!
You are welcome! Thanks!
This is beautiful and you make it seem so easy to do! Thank you for sharing at Party In Your PJ’s.
Thanks so much!
Your dip dyed macramé wall hanging is lovely Wendy.
Thank you for sharing it at Create, Bake, Grow & Gather this week. I’m delighted to be featuring your wall hanging at the party tonight and pinning too.
Hugs,
Kerryanne
Thanks Kerryanne!
Where do I find the bobo wrap bracelet.
Hi Gloria, here’s the link to the bracelet http://www.myfrenchtwist.com/boho-wrap-bracelet/
Macrame is one i have not been able to master. I purchased my first kit some time ago and have not finished it. Looking forward to each of your news letters. Hoping I ll be able to finish my kit. this one is lovely and i just might give this one a try.
hope it helps!