I love handmade jewelry, and I’m especially smitten with this woven cuff bracelet. It’s not only simple to make but an easy way to add a little boho flavor to an outfit!
(Affiliate links included for your convenience. As an Amazon associate I earn from qualifying purchases. See disclosure here.)
supplies:
- bracelet loom kit (includes loom, mini comb, needle & findings)
- thin cotton yarn – tan, orange & pink
- thin jewelry cording
- round nose pliers

step 1 – set up the warp
The term warp refers to the vertical yarn held taunt on the loom. To set up the warp, take a 4″ tail of the thread and secure to the back of the loom with a piece of tape. Then bring the cording through the first slot to the front of the loom and down through the first groove on the opposite end. Next, bring the cording around the back of the next prong (leaving an empty prong between) and up through the slot and back up to the top. I find skipping a prong between the cords makes the weaving process easier. Repeat this process until you reach the desired width of your bracelet. Once cording is through the final slot, leave about a 4″ tail and secure it to the back of the loom with tape.

![]()
step 2 – weave the weft
The term weft refers to the horizontal yarn woven through the warp yarn. Using a tapestry needle, begin weaving by going over and under every other warp thread. Leave a 4″ tail at the beginning. Weaving back the other way, go over the warp thread where you went under and under the thread where you went over.

After each row, gently push the yarn down with the comb, as shown below. When starting a new row, be sure not to pull the yarn too tightly; leaving a little slack helps keep the bracelet shape even.

Changing yarn colors is simple. Once you are finished with one color, leave a 4″ tail (that will be woven in later). Begin weaving with a different color, also leaving a 4″ tail.

Continue adding colors and textures as you please, leaving tails at the beginning and end of each new color. These tails will be woven into the bracelet later.

Measure your wrist size before starting, so you know the proper length for the bracelet. You can see in the photo above that my bracelet did not reach the entire length of the loom.
step 3 – finishing touches
The woven cuff bracelet is almost done. Just a few finishing touches. Starting in the middle, remove one of the warp threads off the prong and do the same for the prong on the opposite end. The bottom of the left loop becomes the top of the right loop. Pull the top of the right loop slowly, causing the left loop to shrink flush with the weft. Repeat this process with the remaining loops until you reach the end of one side. Then repeat the process for the other half of the bracelet. Watch this video to get a better understanding of how to do this.
![]()
You will be left with two cords protruding from one end.

Finally, weave all the loose threads into the back side of the bracelet. After weaving them under a few stitches, snip the end of the thread.

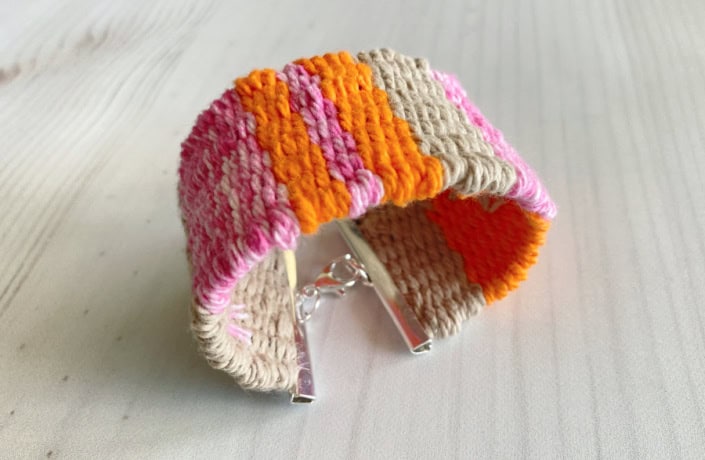
The photo below shows the front and back sides of the bracelet.
![]()
Lastly, place the metal crimps over the ends of the bracelet. Using jewelry pliers, squeeze the crimps tightly closed.


Using round nose pliers, attach a jump ring to the crimp on one end. For the other end, attach a lobster claw clasp to a jump ring, then attach the jump ring to the crimp. Your woven cuff bracelet is now finished and ready to be worn! Get ready for the compliments!
![]()
The biggest compliment is a little share – pin the photo below!
![]()

What a fun tutorial! Thanks for sharing at Vintage Charm!
Wow, Wendy, it’s gorgeous. It’ll be a feature at Handmade Monday later today 🙂
What a cute bracelet ! I love your lovely tutorial, Wendy.
Thank you for sharing with us at Meraki Link Party.
Naush
Congratulations, your pretty woven bracelet is featured in the Friday with friends link party! This is the kind of jewelry I look forward to wearing during summer.
Thanks for adding your post, Wendy:)
Beautiful bracelet and a great idea on how to use up surplus yarn in my stash. I am so glad you decided to decided to visit with us this week and share a post. Looking forward to see all that you create in the year. #HomeMattersParty
glad you liked it!
Fabulous tutorial, I can’t wait to try this with my niece! I’d love for you to join us over at the Creative Crafts Linky Party every Wednesday through Sunday
https://creativelybeth.com/creative-crafts-linky-party-29/
Followed and Pinned! 🙂
Creatively, Beth
Sewing,knitting and woving is just something I cannot master… not even decent lol.
Anyway, great looking bracelet! Love its bright colours!
lol… I understand! Thanks for stopping by!
Love the colors of this bracelet! So fun and cheery. Come and link up to my linky party and share your post with us. https://karinskottage.com/2021/02/karins-kottage-cpw-linky-party-time.html
Karin
P.S. So sorry to hear about your friend. Hugs to you
Wendy, these are some of the colors that I like to wear during the summer. I would love to have a cuff bracelet like this to pair with my outfits.
Thanks for sharing your post at the Friday with Friends link party.
Glad you liked it!
I just came over here from my link party at The Everyday Farmhouse. I’m now kind of obsessed with your blog! I’ve read like four posts when I should be working on my own stuff! Ha! I am sorry about the loss of your friend too. I just read that post. Thank you for sharing your talent with us!
Awe thank you so much!
This is super cute! I may be able to use my sock knitting loom for making this. It’s horrible for making socks since I knit with needles and get way too impatient trying to use a loom. A new life as a bracelet loom may save it from being scrapped. LOL
that’s a great idea!
Cool! Thanks!
you are welcome!