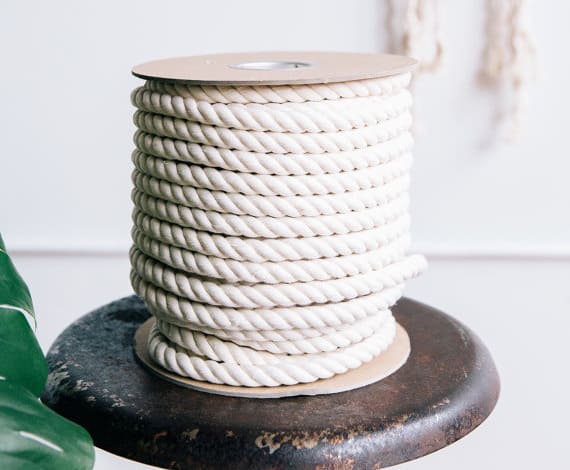
We’re in the middle of an epidemic. Macramania! Ropes, cord, knots and lots more crazy bondage designs are invading our nests. I don’t know about you, but I’m loving it. The ancient art of macrame (rope-weaving) originated in the 13th century. Since then, those first primitive macrame knots used by Assyrian sailors have made their way from fishing vessels to our mothers’ living rooms (plant hangers) to our daughters’ wrists (friendship bracelets.) And now today’s generation is hanging intricate wall-hangings in their digs.
Ready to hop aboard? Macrame is really not that difficult once you learn a few basic knots.
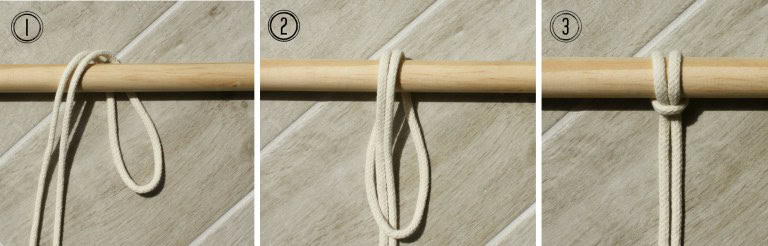
lark’s head knot
In most macrame projects, a simple knot is used to attach the rope to the pole. It is called the Lark’s Head Knot.

square knot
The most common macrame knot is the Square Knot, and many beautiful wall-hangings can be made just using this one knot.
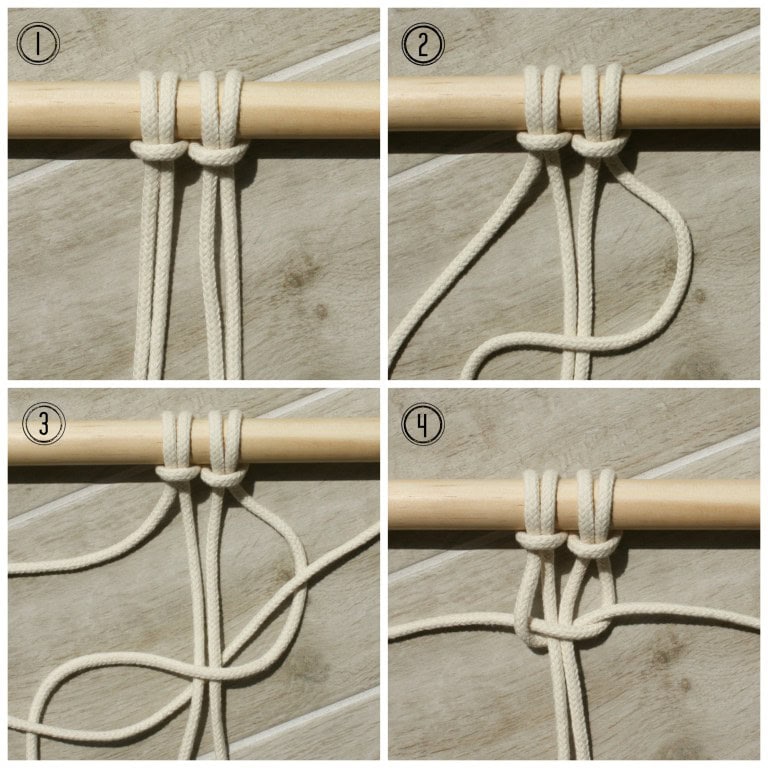

- Always work with 4 strands of rope.
- Place the right outside rope across the 2 center ropes. (Always start with the right side.)
- Run the left outside rope over the right outside rope then under the center cords and up through the opening.
- With the outside strands, gently tighten the knot.
- Make sure the knot is taunt, but be careful not to pull too strongly.
- (Now repeat the first four steps, starting with the left side this time.) Place the left outside rope across the 2 center ropes.
- Run the right outside rope over the left outside rope then under the center cords and up through the opening.
- With the outside strands, gently tighten the knot.
double square knot

- Work with 8 strands of rope instead of 4.
- Place the 2 right outside ropes across the 4 center ropes. (Always start with the right side.)
- Run the 2 left outside ropes over the right outside ropes then under the 4 center cords and up through the opening.
- With the outside strands, gently tighten the knot.
- (Now repeat the first four steps, starting with the left side this time.)
- With the outside strands, gently tighten the knot.
wrapped knot
This technique is frequently used to tie off the bottom of macrame planters.


- Cut an extra piece of rope that is approximately 4 feet long. With the extra piece, make a small loop (about 3-4″ long) next to the area on the planter where you want to tie it off.
- Leaving the top of the loop visible, begin the wrap the extra cord tightly around the entire cluster of cords.
- Keep wrapping it downward until there is just a small bit of the loop showing.
- Run the end of the “wrapping cord” through the part of the loop still showing.
- Using the top of the “wrapping cord” that was left showing, pull upwards firmly in order to bring the bottom loop and rope end under the wrapped section (so they are hidden).

Once finished with the Wrapped Knot, cut the ends of the planter to the desired length.
The biggest compliment is a little share – please pin the photo below!
IF YOU ARE DIGGING MACRAME, CHECK OUT THIS POST:
- MAKE THIS BEAUTIFUL MACRAME WALL-HANGING FOR BEGINNERS
Hello , How do I calcula Toon to cut the thread, to make a proyect? Thank you.Lorena from Argentinia
This article should help 😊. http://www.myfrenchtwist.com/tips-for-planning-your-next-macrame-project/
This is amazing! So much easier to follow and learn from then the macrame book I have now. Thanks!
Wow. Thank you so much!
Where do you buy your rope from?
Do you ever use a colored rope ie red blue or yellow and where can I get some?
Hi Beth. I get colored rope from Etsy here https://www.etsy.com/listing/555355275/diy-macrame-rope-5mm-cotton-cord-bundle?ga_order=most_relevant&ga_search_type=all&ga_view_type=gallery&ga_search_query=indigo%20macrame%20rope&ref=sr_gallery-1-5&source=aw&utm_source=affiliate_window&utm_medium=affiliate&utm_campaign=us_location_buyer&awc=6220_1532224637_8503d33384ec7223db1e17a1b9d292de&utm_content=481223
Hope this helps!
Pretty! What type of rope do you like to use?
I prefer cotton rope and usually buy clothesline rope from amazon
Thanks for the tutorial. I made one it’s beautiful.
That’s awesome! Thanks for your comments!
I have washed my white macrame bag and now its colour is not so white, it seems as something brown, what can I do to put again in nice white again?
If it is woven from cotton cords you can soak it in water mixed with OxyClean. You can buy this in the grocery store with the laundry detergents. Hope this helps!