If you follow MFT, then you know that construction of an extravagant Barbie house is underway in my studio. I’m talking custom-made furniture, a tiny painstakingly woven macrame wallhanging, and lots more DIY projects that will make Barbie’s friends drool with envy. But until I “break ground” on Barbie’s new villa, I’m lending my designer skills to help my friend’s daughter build her own bookcase dollhouse.
DISCLOSURE: This post is about building a dollhouse WITH your child, not FOR your child. If you’ve got a creative kid on your hands and are looking for an easy approach to converting an old bookcase into a dollhouse, you’re in the right place. All you need is a bookcase, paint, glue gun, sewing machine, X-Acto knife, and a bit of imagination. No fancy tools required. (I did use my jig saw for cutting out windows, but that’s optional.) There may be a crooked table leg or an uneven curtain hem, but the experience of building something together is more important than the end project. Besides, even the most amateur bookcase-turned-Barbie-condo will blow those pink plastic Mattel track homes out of the water.
So here is Lydia’s bookcase dollhouse. And it’s about way more than cardboard bricks and pillows stuffed with cotton balls. It’s about building a friendship with a little girl whose passion is contagious. I have friends of all ages, but this eleven-year-old is one of the coolest.
 (Affiliate links included for your convenience. As an Amazon associate I earn from qualifying purchases. See disclosure here.)
converting the bookcase
supplies:
- bookcase
- sandpaper
- primer & paint
The bookcase, confiscated from Lydia’s parents’ basement, had adjustable shelves. This made it easy to reconfigure the shelving to create two floors with ceilings tall enough to accommodate Barbie and Ken.

Lydia sketched the room lay-out, while I used a jig saw to cut out windows. Turn the bookcase onto its side, then drill 4 large pilot holes that form a square. Insert the jig saw blade and cut out a square. Don’t worry if it’s not perfect; frames will be added around the window openings to camouflage any imperfections.

Next, I assigned Lydia the task of a light sanding and a coat of white primer. We left the middle shelf, the top and the floor of the bookcase unpainted.

Lydia’s parents actually offered us two bookcases, so we decided to give Barbie an upgrade and double her square footage. In this post, however, we’ll only showcase the first one we tackled, which we converted into a teenagers’ bedroom, bathroom, living room and foyer.
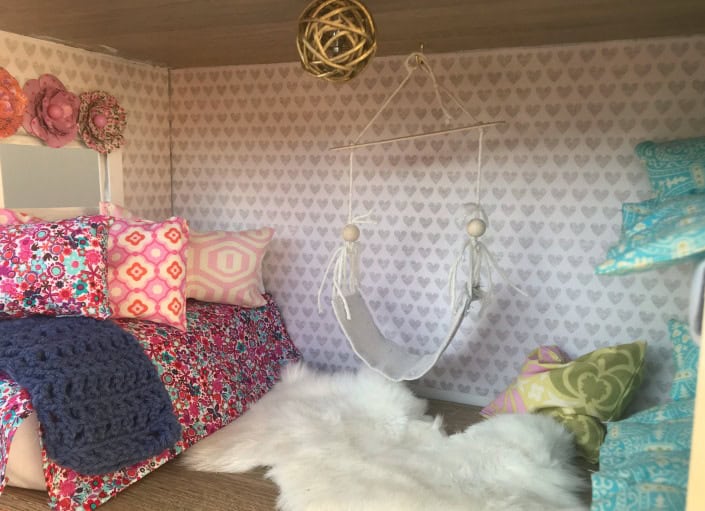
teenagers’ bedroom
Not just a bedroom, mind you, but according to Lydia this is the ultimate teenagers’ bedroom. A very sacred place indeed to a little girl with older sisters. For wallpaper, we adhered scrapbooking paper to the walls with Mod Podge. Don’t fret over small wrinkles; they tend to fade away after it thoroughly dries.

We framed the window with large popsicle sticks painted white.

The daybed is simply a pasta box covered with batting and cloth. During this dollhouse project, Lydia learned to operate my sewing machine! She made the bedspread and pillow.

We also added a set of bunk beds, made from spaghetti boxes and two pieces of wood.

The light fixture is a wicker ball painted gold, stolen from a garland of string lights. The hammock was Lydia’s idea, made from yarn, wooden beads, cloth, and a popsicle stick.

living room

We started decorating the living room by covering one wall with craft paper. Then we added a fireplace, which Lydia made from cardboard.


While Lydia fashioned a coffee table by gluing wooden beads to a wooden disc, I built two chairs from cardboard. I hot glued four pieces of cardboard together, as shown below. Then I covered with fabric, gluing in place. Now that Lydia has conquered the art of sewing pillows, she added a couple to the chairs.


We also used cardboard to make a couch, then we covered it with felt, which works great because the edges don’t fray. Yep, Lydia made another pillow.

For curtains, Lydia stitched two panels and learned how to make a casing. (For non-seamstresses, a casing is simply fabric folded over and sewn down to create a pocket for the curtain rod.) For the rod, we spray painted a tiny dowel gold, used a wooden bead as a finial and screw hooks for brackets.

The focal point of the living room, though, is not the fireplace Lydia dutifully and tediously pieced together. It is the tiny flat screen TV, remote, DVD player and tapes I bought from Etsy. During the entire living room construction, Lydia kept bringing her dolls out for a test drive of the furniture, explaining how they will spend lots of time in that room watching TV. Well, last I checked, Ken didn’t have a steady job, so I had to gift them a television.

bathroom

For the bathroom, we used craft paper for the floor and the brick wall. The vanity is made from cardboard covered with craft paper; the sinks are furniture risers we spotted in the hardware store; and the stool is the plastic center of a pizza box. Our creative juices didn’t stop there, though. Just take a look at those tiny grommets in the shower curtain.

With a hot glue gun, we covered an empty Keurig coffee pod with twine for the basket. Then we filled it with tiny towels cut from a washcloth.
Although there are miniature tubs and toilets for purchase, Lydia has saved pins, watched YouTube videos, and strategized for weeks on how to fashion a tiny toilet ourselves. Who am I to deprive her of that satisfaction? It’s still a work in progress, though, so you’ll have to wait for the tutorial!
foyer

I told Lydia that a foyer with such a high ceiling deserved a dramatic paint color, so she chose this vibrant aqua. The door is made from a piece of cardboard covered with craft paper. Lydia constructed a shoe shelf from wooden beads and popsicle sticks. For a door mat, she also decorated a piece of cork cut from a coaster with sharpies. The chandelier, though, was the most fun to create, using only fishing line, circles punched from cardstock, and a glue gun.
deck

With a piece of felt and some sample tile squares from the Home Depot, we converted the top of the bookcase into a rooftop deck. We painted wooden garden stakes white then glued them together for the fence. Barbie and Ken will just have to wait on patio furniture, because the construction crew and decorators are taking time off for the holidays. But… we’ll be back very, very soon with Part 2 of Lydia’s dollhouse, so keep in touch!
The biggest compliment is a little share – pin the photo below!