
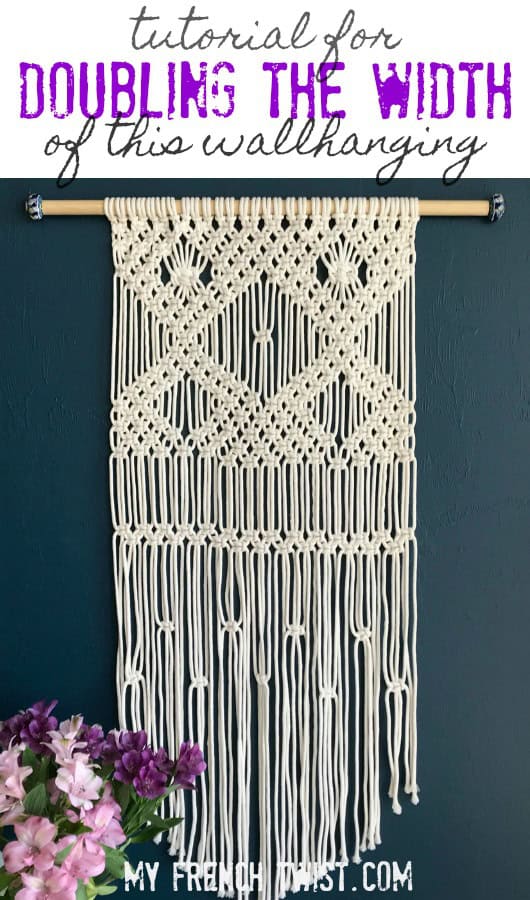
Doubling the width of a macrame pattern is a useful skill, especially if you want to transform a lovely little wall hanging into a wide, more prominent piece of art. Last year I translated an old macrame pattern from French to English and shared the tutorial with my readers. It’s not a complicated pattern with advanced knots but rather a simple design suitable for the beginner macrame artist. And I think its simplicity is lovely.
Because I receive frequent questions about how to double the width of this wall hanging, I decided to create a fresh tutorial for doing just that!
This may seem like a no-brainer. Just repeat the pattern, right? Actually, nope. Sometimes there are nuances in designs that need to be considered. For example, below is a graphic of what it would look like to increase the width of a macrame plant hanger using 3 different methods. First, by simply repeating the pattern, you can see the result. The second method repeats & flips the design (as if opening the pages of a book). It’s a little better but not perfect. And lastly (the best approach) is to repeat, flip, and then edit the design. This ensures you will end up with a pleasing, artistic pattern.

Confused? Don’t worry. I just wanted to share this with any of my left-brained analytical readers. But if you just want to get on with the project, keep reading. I’ve done the thinking for you, and here’s an easy-to-follow tutorial for making a wider version of the sweet wall hanging I posted not too long ago.


The tutorial below has a similar design (illustrated in the mock up above) but with a finished width of 44″ instead of 22″. The length remains 48″ but can be easily adjusted by adding more rows.
(Affiliate links included for your convenience. As an Amazon associate I earn from qualifying purchases. See disclosure here.)
macrame supplies needed
- One dowel rod 56″ long
- Two ceramic drawer knobs to use as finials (optional)
- Ten 100-foot rolls of cotton clothesline (3/16″) (found the best price here.)
- Masking or painter’s tape
- Scissors
getting started
Cut rope into 56 pieces, each 16 feet long. Tie the cords onto the pole, with Lark’s Head Knots.

learn the square knot
The Square Knot is the most basic of all macramé knots, and it is the only one you’ll need to know in making this wall-hanging. Using this tutorial, practice a few times until you get the hang of it.
macrame pattern
Now that you have 56 Lark’s Head Knots tied onto your pole, and you’ve mastered the Square Knot, it’s time to begin weaving the wall-hanging. This project consists of 25 total rows.

- Start with 1st cord: 28K
- Start with 3rd cord: 27K
- Start with 1st cord: 3K – S4 – 6K – S4 – 6K – S4 – 6K – S4 – 3K
- Start with 3rd cord: 2K – S8 – 5K – S8 – 5K – S8 – 5K – S8 – 2K
- Start with 1st cord: 2K – S2 – 1DN – S2 – 4K – S2 – 1DN – S2 – 4K – S2 – 1DN – S2 – 4K – S2 – 1DN – S2 – 2K
- Start with 3rd cord: 2K – S8 – 2K – S4 – 2K – S8 – 5K – S8 – 2K – S4 – 2K – S8 – 2K – S2
- Start with 5th cord: 2K – S4 – 2K – S8 – 2K – S4 – 2K – S8 – 2K – S4 – 2K – S8 – 2K – S4 – 2K
- Start with 7th cord: 4K – S12 – 4K – S12 – 4K – S12 – 4K
- Start with 9th cord: 3K – S16 – 3K – S16 – 3K – S16 – 3K
- Start with 11th cord: 2K – S20 – 2K – S20 – 2K – S20 – 2K
- Start with 13th cord: 1K – S10 – 1K – S10 – 1K – S24 – 1K – S10 – 1K – S10 – 1K
- Start with 11th cord: 2K – S20 – 2K – S20 – 2K – S20 – 2K
- Start with 9th cord: 3K – S16 – 3K – S16 – 3K – S16 – 3K
- Start with 7th cord: 4K – S12 – 4K – S12 – 4K – S12 – 4K
- Start with 5th cord: 2K – S4 – 2K – S8 – 2K – S4 – 2K – S8 – 2K – S4 – 2K – S8 – 2K – S4 – 2K
- Start with 3rd cord: 2K – S8 – 2K – S4 – 2K – S8 – 2K – S4 – 2K – S8 – 2K – S4 – 2K – S8 – 2K
- Start with 1st cord: 2K – S12 – 4K – S12 – 4K – S12 – 4K – S12 – 2K
- Start with 3rd cord: 2K – S8 – 5K – S8 – 5K – S8 – 5K – S8 – – 2K
- Start with 1st cord: 3K – S4 – 6K – S4 – 6K – S4 – 6K – S4 – 3K
- Start with 3rd cord: 27K
- Start with 1st cord: 28K
- (Begin this row about 5 inches lower than the last row.) Start with 1st cord: 28K
- Start with 3rd cord: 27K
- (Begin this row about 5 inches lower than the last row.) Start with 3rd cord: 1K – S8 – 1K – S8 – 1K – S8 – 1K – S8 – 1K – S4 – 1K – S8 – 1K – S8 – 1K – S8 – 1K -S8 -1K
- (Begin this row about 4 inches lower than the last row.) Start with 9th cord: 1K – S20 – 1K – S18 – 1K – S18 – 1K – S20 – 1K
trimming the bottom
Place the wall-hanging on a flat surface (I used the floor) and straighten all the cords. With careful measuring, place the tape across the strands of cord to form a “V.” This is your guide for cutting.

finishing touches
For an extra Bohemian touch, I used ceramic drawer pulls as finials, screwing them into the ends of the pole.

extra tips & explanations
When skipping space between rows, use tape as a guide and a level to make sure they are even.


the biggest compliment is a little share – pin the image below!

Hi Wendy, I make a 12” tree of life and someone wants me to make one 36” now. How do I calculate knots and cord for that?
Tank you for your help!
Hi, Wendy, I am looking forward to completing your pattern of the wall hanging for beginners. I am all set to go. I have 28 lark’s head knots on my dowel. I know how to make a square knot with 8 cords. But, I don’t know how to read the pattern. I understand the legend. For example, Direction 1: Start with first cord and do 14knots. So do I take the first eight cords from the right side and make 13 complete square knots going down? Instruction two says do 13 knots starting with the third cord. So does that mean I take the third- the eleventh cord and do square knots down? Could you also give more explanation for skipping cords. Provide an example from the pattern please. Finally DN stands for double knot. Does this mean use 8 cords or 16? Thank you!
I did macrame back in the 70’s and my granddaughter wants to make a wall hanging for her dorm room. My problem is, I don’t remember how long to cut the cords. Is there a rule of thumb? Please advise. Thank you, Kathy
Some resources say 8 x the finished length, but I have found that at least 6 times is usually enough. Sounds like a lot but remember that each piece I actually 2 cords bc it’s tied in a larks head knot
You can see more tips on my macrame pg on my blog😊
Hi Wendy, i am starting to do these wall hanging but X 3, triple, can you help me? I decided these becouse i have a thin cord and i need 90 cm of width in the final wall hanging. thank you very much!!
I’m a bit confused because those two big knots in the picture are NOT double square knots. But in the pattern it says to do one double knot. (Row 5) Is the picture from a different pattern? Can you tell us how to do the knot in the picture?
Perfect, easy to follow! I will try it for my bikini blouse. Thanks so much for these helpful instruction.
You are welcome, Malissa. Thanks so much for stopping by!
Hi Wendy. I was hoping you could help us, we are having a bohemian wedding. We want to make our own table runners and backdrop. We aren’t sure how to get the size we need and what size rope we need. We need to make 30 table runners. Hoping 14 inches wide and 46 inches long.
Hi Tracie, Sorry I didn’t get back to you sooner. For the runners, I suggest following my tutorial here. http://www.myfrenchtwist.com/easy-macrame-table-runner/ But to shorten it to your desired length, I would follow it through step 3, then delete the middle section and pick it up again at step 6. The tutorial suggests 3/16″ rope and where to get it. Instead of 389 feet per runner, you could probably get by with 275 (min) to 300 ft (max) each one. Try the first one then you will know for sure how many feet is needed. You could even simplify the runner instructions and leave out the little side diamonds. It would still be just as cute and make a wonderful impact. You can also make the fringe on the end a bit shorter than the tutorial suggests. Measure as you go along to see where your length is. If you feel this is not helpful and still feel confused, I can try mocking one up this coming week and send you the specific pattern. Wendy